Sunday, August 8, 2021

How much do you bench? Buying a jewelry bench

The jewelers bench is often described by our students as the missing tool. It's what brings all of your jewelry tools together in one place, in an organized cockpit of creativity. The torch is ready, the flex shaft is mounted. The bench pin is in place, front and center. You've got drawers, bags, hooks, cups, rotating organizers. So many tools at your trembling finger tips... and then you wake up and realize you don't even have a bench yet. WTFudge? Well, that's just not right. Time to fix that!


A jewelry bench can be an expensive investment. And a tough decision. Do you buy one? Make one? If you're buying one - where can you get it? And how much will it cost to ship? Let's talk about jewelry benches, from starter options to budget busters. 

If you're not up for some DIYJB (Do it Yourself Jewelry Benching), and you need something inexpensive and lightweight, try these student benches from Otto Frei. The Durston Basic Starter Jewelers Cedar Workbench comes plain. BYOB (Bring your own Bag). You can add your own leather sweeps bag. Or you can get the Durston Student Jewelers Workbench Plus which comes with one. You've got a leather bag for a sweeps tray, which some people prefer. You can snap it and everything  - tools, stones, dust, and memories - comes down to the center where you can find it. It's at the right ergonomic height and it's light enough to put away if your studio needs to turn back into the guest room.


Need a little more? Then you can try a more robust bench, like the American Made Jewelers Workbench MO-60. This model is what our students use at school and we have it tricked out with the works when it comes to jewelry tools. It's sturdy, heavy duty, and has all that you need. 

If you need something that will be less expensive to ship, try these UPS friendly versions of the jewelers bench. What you get when something is UPS-able is a bench that is made of lighter, softer wood and the drawers are usually smaller. But then again, the price and shipping cost is usually less, too. Oh, and expect to spend some time with a wrench and instructions, because they are flat packed for shipping. 

Finally, if price is no object, well step right this way into the VIJ (very important jewelers) area. Let me just lift the woven gold rope for you. Can I get you something to drink? Would you like us to clean and tighten your Optivisor? I bet you would! Now buckle up, mate. Welcome to lush. 

What can a custom bench get you, besides a case of the thrills everytime you sit down at the helm of your very own luxury work area? Let's talk about sweeps trays with rounded corners or that curve to meet your svelte belly, aka the gemstone ski slope. You can already see the precious metal dust trickling into that chromed beauty as they fall into its embrace. Ahem. Excuse me. I don't know what came over me. Well. You also can get more drawers, anvils built into the bench top, and lots of places to store your best tools. 


Whichever bench you choose, to buy or make, to budget or bust, be sure to make it your own. Need some inspiration? Check out some free videos on how to organize your bench for fabrication or wax work. And check out Charles Lewton Brain's fantastic book the Jewelers Bench Book. 

And I'd love to hear your comments and tips about jewelers benches. What was your choice? What kind of bench did you get? Did you make one and how was the experience of doing that? 


Saturday, September 19, 2020

Metal Clay and Fused Glass


                                                            Metal Clay and Fused Glass             

                                                                 by: Arlene Mornick


I love the uncomplicated beauty of glass. Looking through glass, I have the choice of seeing a likeness, if needed, or beyond to the porthole of my surroundings.  Add the reflective quality of art glass and the trance intensifies as the color palette of my world expands.  To enhance the look and uniqueness of my fused glass cabochons, I use the amazing medium of fine silver metal clay.  The low fire metal clay now available is very compatible with fused or lamp worked glass.   What better way to double the pleasure and enjoyment of jewelry then to marry the two mediums?  


My approach to combining the two elements (glass and metal clay) may be different from other artists.  When I create my jewelry pieces using glass, I use the metal clay to simply capture the class. Then in the firing when the clay shrinks its normal 8%, it acts as giant prongs holding the glass in place. 


Consider the following when constructing a glass and metal clay project. Remember during the construction of your piece the silver clay will shrink, therefore, when laying, sculpting, or molding your clay around the glass, do so gently but securely. Any silver touching the glass must not be tight fitting but instead gently lie on or touch the glass.  During the assembly, if the silver is securing the glass cabochon too tightly, when fired, the silver or glass may crack at the tightest point.  


What I am suggesting is that the silver must secure the glass, but that the construction and design must account for the shrinkage.  The best way to think about it is to remember to place the clay on or near the glass, do not pull the clay or fasten the clay tightly around the glass.


Join me for Metal Clay classes at Silvera Jewelry School  :: Browse classes


Tuesday, September 8, 2020

Tips for Making Hinges and Knuckles With Metal Clay


Arlene Mornick is an instructor at Silvera Jewelry School. She teaches online Zoom classes and in-person workshops in metal clay techniques, for beginners to advanced students.


A hinge is a movable joint or mechanism on which a top swings as it opens and closes over its base; or a component that connects linked objects. In wearable designs a commonly used jewelry hinge is called a “butt hinge.” 


The key components of this hinge are tubes called “knuckles” alternatingly fixed to the two adjoining sections of the design allowing one section to move while anchored to its base. Most often three knuckles are used, one attached and centered on the base of the piece.  The other two knuckles are attached to the adjoining edge, placed so that when fit together they line up on either side of the centered knuckle. Rotation of the knuckles around a center pin will enable the jewelry piece to open and close or swing as in my earring project. 


Options for Making Knuckles

One of the challenges to creating a butt hinge in metal clay is making the knuckles, which need to be uniform in size and shape.  There are a variety of ways to do this. Here are a few.


  • Recommended - Use a syringe. Trim the open tip off an empty syringe. Load the syringe with about 3 grams of clay.  Extrude the clay into a uniform snake. Trim the snake to the desired length of each knuckle.   Use a drill bit and hand drill a center hole through each knuckle. 


  • Roll a clay snake approximately 4 to 5 mm thick. Trim the snake to the desired length of each knuckle.  Use a drill bit and hand drill a center hole through each knuckle.

  • Create a clay tube: flatten clay to .75 mm thickness; wrap the flattened clay around a toothpick or 14-gauge wire; trim and seal a perfect seam with no clay overlap.  Trim the clay tube to desired knuckle length. 

  • Use the Makin’s Clay Extruder. Inside the barrel place clay, the extruder adapter and fit the rubber gasket inside the adapter and screw on the top. Using the handle, extrude a long hollow clay tube and remove from the extruder with sharp knife.  Straighten the tube. Then trim to desired knuckle length.


Options for Center Pin

Placement of the center pin wire can be done before firing or after.

  • Recommended - After firing:  To complete the hinge, line up the hinge knuckles and insert a piece of appropriate gauge half hard wire.  Trim the wire until there is approximately .5 mm extending from each side of the hinge, and hold the hinge perpendicular on a small anvil.  Gently tap the exposed end of the wire with a riveting hammer to expand that end.  Flip the piece and tap the other end of the wire. Continue in this manner until the rivet is secure.


  • Before firing:  Choose a gauge of wire that easily fits through the affixed knuckles.  If the wire fit through the knuckles is too tight the shrinkage of the clay knuckles during firing may trap the wire and impede rotation of the hinge. Trim the wire so that it is shorter than the length of the three lined up knuckles.  Feed the wire through all three knuckles.  Plug the two exposed ends with wet clay.  Dry. Fire project according to manufacturer’s recommended schedule.

Join me for Metal Clay classes at Silvera Jewelry School  :: Browse classes

Wednesday, August 26, 2020

The Alchemy of Metal Clay

By Arlene Mornick


Arlene Mornick is an instructor at Silvera Jewelry School. She teaches online Zoom classes and in-person workshops in metal clay techniques, for beginners to advanced students. 


To introduce artists to Metal Clay, I have offered demonstrations at schools and conferences in the Bay Area and beyond.  Metal Clay when taken out of the package looks like a “blob” of – well what else but “clay.”  Hence, the question I am frequently asked, “when does it become metal”? So just to be clear - it is metal from start to finish.  Here is a brief explanation of what Metal Clay is all about. 


Metal clay consists of micron-size particles of metal plus binder and water.  The binder and water grant malleability to the metal, so that it can be easily shaped in a variety of ways.  


Metal clay is moist and supple when taken from its package. Texture can easily be impressed on the surface and the clay can then formed in a variety of ways.  Once the clay is shaped, its water content should be allowed to dry out either naturally through air-drying (18 to 24 hours) or by use of a heating device (eg, hot plate, hair dryer, etc.) for 15 to 30 minutes.  In the water-dried state (more commonly called greenware), the binder is still actively holding the metal particles together. At this point sanding, filing, carving, and other techniques may be performed cautiously with the knowledge that the binder connection may be easily broken (but also easily repaired).


Once the design of an object is complete, high heat is applied to the piece either with a torch or in a kiln.  The first effect of the heating process is burnout of the binder.  This is observed when ignition of the binder causes an engulfment of the piece in flames. These flames will dissipate in a few seconds, and the continued application of heat will initiate the far less observable process of sintering, in which high heat promotes the attraction and bonding of the atoms.  The result is a solid mass of metal that has been compacted without melting. All manufacturers of metal clay will suggest firing schedules for the proper sintering of their products.  


If silver is the clay’s metal component, the surface of a piece will appear white when sintering and cooling is completed. This is due to uneven crystals on the surface that prevent the reflection of light. But the finishing process of burnishing and polishing will compress the crystals, making the silver color visible. 


Join me for a class and learn all about this wonderful material.


Saturday, January 14, 2017

How to Condition your Rawhide Mallet

"Hey, my rawhide mallet is making marks on my metal. I thought it was not supposed to do that?"

Yup, that's right, your trusty rawhide mallet isn't perfect. Especially when it's brand new. Even though leather is softer than your metal, an unconditioned rawhide mallet can imprint some texture on softer non-ferrous metals, like alloys of silver and gold.

Did you know you can condition your mallet? Now you do. It involves water, but luckily no shampoos. Basically your mallet is glued and sealed in the factory, leaving it hardened from the process of making it. The sealant and hardened leather imprint your metal. How can you tell if your mallet is still new? Well, a new mallet will clearly show the spiral of the leather wrapped up to make the head.


A conditioned mallet blurs the mallet face. The layers are no longer visible, and this softened and frayed leather is less likely to mar your surface. Check out this 25 year old mallet from near the start of my career.


One way to condition a mallet is to use it. A lot. Over time, the face will naturally smash and fray into a lovely soft surface. But this can take time to develop, like months or years. There's a faster way.

The faster way to condition your leather mallet is to soak it and smash it. Soak just the leather head in a bowl of water for 2 hours. This dissolves the sealant and starts to swell the leather.


After soaking, dry it off. It's smashing time! Hammering the mallet against a hard surface will accelerate the blurring of the edges and soften the leather. Good candidates include sidewalk, cement blocks and bricks. Pour yourself a drink, cue up your favorite raucous music, and get clobbering. Swing and wield the mallet as usual, hitting the cement for about 10 minutes per face. Hitting on the sharp edge of the cement or curb will work the leather faster.


It's done when the leather looks satisfactorily softened and compliant. Or the music stops. Or you run out of liquor. In any case, you're done. Job well done! If only work was so easy and cathartic. Be sure to remove any bits of rock or cement that may have embedded in the leather or they will definitely imprint your metal.


Enjoy your conditioned and obedient mallet. For more helpful tips, check out the other articles on our blog. We also post free videos about jewelry making at SilveraJewelrySchool.com/videos.


Monday, December 19, 2016

7 Gift Ideas for Jewelers (or yourself!)

Do tools make it easier to make jewelry? Well, not by themselves, but sometimes yes! When used correctly and at hand, a good tool can make all the difference. Here's a list of tools that make a difference. Some might even say they're life changing - when it comes to making jewelry, that is. How they change the rest of your life is up to you.

( 1 ) Miter Vise 
Can't file a right angle to save your life? A miter vise, also known as a filing block is a great friend when it comes to sawing and filing right angles and 45° angles on wire, sheet and tubing. Just slide your metal in place between the jaws and saw and/or file to the flat face of the block. Done! This is a great aid for making good joins for soldering. Just use a cheap file with the miter vise. Filing against the hardened steel of the block can wear out their teeth. $62.95

Buy it at Silvera Jewelry School. Limited time offer - 20% Discount Code HOHOHOLIDAYS good through 1/10/2017

( 2 ) Magnetic Finisher 
This tool has changed how we polish. Now you can make a ring, earrings, etc., polish it to a 400-600 grit finish (in other words get rid of scale, scratches and defects), and then drop it in the magnetic polisher. In as little as 20 minutes the super fine steel shot in this machine will render a beautiful polish on your pieces. The fine shot also gets into all the nooks and crannies in your pieces, unlike larger shot. They're pricey, but think of the time it can save you? While it's polishing, you can do other work. $470

Buy it at RioGrande.com or OttoFrei.com

( 3 ) Quick Change Handpiece 
Change bits without a chuck key! Just turn the switch to open and close the chuck, to easily load new bits. The slender handle is more comfortable and the clever design allows you to hold it near the bit for better control. Love my quick change handpiece! Works with any flex shaft brand that uses a key hole style shaft, including Foredom. $44.95

Buy it at Silvera Jewelry School. Limited time offer - 20% Discount Code HOHOHOLIDAYS good through 1/10/2017


( 4 ) Bench 
The jewelry bench is the missing tool. It's everything you need at hand, in a small foot print. Plus the bench puts your work at the right height for the best ergonomic work station. And you can leave your bench and come back and pick up where you left off anytime. Trick it out with a GRS removable bench pin and a GRS soldering station for even more jewelry-time enjoyment. $310 or more

Buy it at OttoFrei.com (or pick them up if your local at their warehouse in Oakland, CA)


( 5 ) Fine Files 
Fine files, like Swiss cut #4 files are fantastic for clean up on your pieces without leaving a coarse file texture, or to remove that coarse file texture from other files! I recommend at least a #4 Swiss cut half round hand file and a #4 Swiss Cut half round needle file (great for rounding the sharp edges of ring shanks). While you're at it, get a set of Frederich Dick needle files with handles. These are the best and really do make filing easier and more effective. I recommend either a medium #3 or fine #5 cut (these are German files, so German numbering system).  $6.95 +

Buy it at Silvera Jewelry School. Limited time offer - 20% Discount Code HOHOHOLIDAYS good through 1/10/2017

( 6 ) Pepe Disc Cutter 
Pepe has made a fantastic disc cutter that you'll love. Use it to pop out smooth edged discs. And you can get it with a centering tool for making washers. If you like circles, you'll love this disc cutter.  $189.00

Buy it at OttoFrei.com


 7 ) Guillotine 
No one is chopping off any heads, so relax. A guillotine is used to cut metal sheet. As opposed to a bench shear that cuts sheet and distorts it, a guillotine cuts evenly across the sheet for a flat even cut. Use it to quickly cut blanks wit straight edges and right angle ends. We  have a rolling mill too, but we use the guillotine 10 times more for cutting bracelet and ring blanks, and lots more.  $6.95 +

Buy it at OttoFrei.com


Bonus time! Do you have an flex shaft and wish you had better speed control with your pedal? You don't have to buy a whole new machine. Just upgrade your pedal. Lucas Dental makes a great foot pedal with fantastic speed control for just about any flex shaft. Turn your inexpensive flex shaft into a luxury machine with their Low Boy Foot Pedal for just $49. It makes it easier to use burs for settings like flush and tube, and lots more tasks.

Well, there are always more tools you can buy that are wonderful new additions to your collection. But I hope you enjoyed this list and that one or more of these make you or someone special very happy. Thanks!

- Joe Silvera


Wednesday, October 19, 2016

Interview with Cielomar Cuevas of Cielomar Jewelry


I'd like to share with you an interview with Cielomar Cuevas, owner and designer of Cielomar Jewelry. It was our pleasure, Anat and I at Silvera Jewelry School, to be a small part of her beginning with the craft of jewelry. She's graciously allowed us to share her story of how she has started her gorgeous jewelry line and new business, to help inspire our students and budding jewelers.


(Silvera Jewelry School) How did you get your start making jewelry?

(Cielomar) I’ve always loved art and design and enjoy collecting unique jewelry during my travels. When I moved to California in 2010, I took an intro to jewelry class at CCA where I learned the basics about jewelry making. After taking the class several times, I decided to seek other learning opportunities in the Bay Area where I could learn a variety of jewelry making techniques in order to build expertise and hone my craft…and that’s when I found Silvera Jewelry School! I started by taking torch enamel classes with Anat and I fell in love with the school. Soon after, I set a goal for myself to take every single class that interested me and that I could possibly fit into my schedule in order to accelerate my learning and develop my style. I took a great amount of classes including Torch Enamel, Lost Wax Casting, Keum Boo, Stone Setting, Chain Making and even a fantastic workshop with Jayne Redman were I learned about making multiples with blanking dies and making jigs. In 2014 I established my home studio and launched an online shop, as a response to my love for making jewelry and the incredible support from friends and family for my jewelry designs.


(SJS)Your degree is in graphics and design. And you're currently a full time art director. How does your graphics background influence your jewelry design?

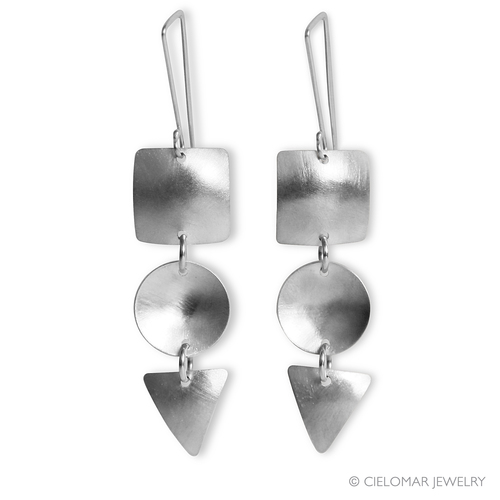
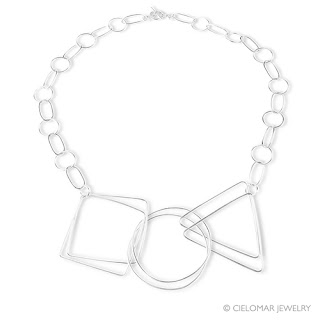
(C) My graphic design background drives the way I design and make jewelry in many ways. I’m inspired by bold geometric shapes and develop my designs in terms of the components that create the overall piece. I always start with a loose sketch and then take the design to the computer to create templates whenever precision cutting is required.  In addition to this, my full time job influences my jewelry designs greatly since I’m always searching for the latest fashion and cultural trends as well as researching unique materials and techniques to apply to my work. 


(SJS) You have a wonderful website. Any advice for jewelry artists starting out on the best way to make a professional looking website? 

(C) First and foremost, I think that a website is a never-ending work in progress and once you are ok with that idea the pressure of having a perfect website goes away. I’ve been working on my website for about a year now, always adding new features to improve the way customers experience my brand. I use Squarespace as my platform and I find it very user friendly and I love all of the integrations that it offers including: Mailchimp, Xero, Instagram, Facebook and Pinterest. Lastly, but actually most important is to have consistent photography that is well lit and reflects your brand. Since the customer is not seeing the piece in person, you have to help them understand everything about your jewelry through your images including: color, texture, scale, value and even and how to style it. 


(SJS) This month you're donating part of your sales to benefit research for a cure for breast cancer. I can tell this is important for you. Can you talk about why?

(C) In recent months two close people in my life have been diagnosed with breast cancer and knowing that they have to go through this process has been very difficult. I decided to partner with the Breast Cancer Research Foundation in order to do my part in finding a cure for breast cancer. During the month of October, I’m donating 10% of every sale completed through my website www.cielomarjewelry.com and I also have a fundraising page where people can donate with no purchase necessary. If you are interested in learning more about our fundraising you can also visit, give.bcrfcure.org/cielomarjewelry


(SJS) You're balancing a full time job AND a jewelry business. Any advice for artists who are just starting and looking to juggle the same or similar commitments? 

(C) I’ve been able to balance a full time job and a jewelry business by being consistent with my schedule and allocating time for work, jewelry making and family. I make time every day to work on my jewelry business and I divide my tasks by day in order to make the most with the time that I have available. Tasks include designing, ordering materials, jewelry making, accounting, photography and website updates. I also make sure to go to bed by 11:00 PM in order to get enough rest and be productive the next day. Another important thing when starting a jewelry business is to surround yourself with other jewelry makers that are developing their own businesses and understand your needs. Find a local school, an online jewelry community or even an industry organization like SNAG (Society of North American Goldsmiths) where you can talk to other makers, ask questions, stay up to date on the latest in the industry and connected with your community.

(SJS) How do you find inspiration for your designs? Is it a favorite artist or jeweler? How do you get those creative ideas flowing when you're a little stuck? 

(C) I’m always looking for inspiration everywhere I go and I love photographing things that inspire me including architecture, street art and sculptures. I’m especially inspired by Joan MirĂ³ and Alexander Calder because of their minimalistic style and unique shapes. Additionally, I always have a pencil and a post-it pad close by to keep track of the design ideas that pop into my head on a daily basis. I review them afterwards and select my favorites to develop depending on my line needs…although sometimes I make things because I love them and they excite me. Time on the bench should be fun as well!


(SJS) And what does the future hold for Cielomar, in say 5 years? 

(C) I’m currently focused on developing a jewelry line that is more production focused in order to fabricate inventory at a larger scale. I recently started collaborating with a local mold maker and caster, and they are helping me to develop components for my line that I can then use to create a variety of jewelry designs. I’m also looking to expand my brand presence to boutique stores that fit my brand aesthetic as well as museum stores across the US. I’m excited to continue refining my brand aesthetic and connecting with other unique women who love to make a statement everyday!