Sunday, July 8, 2012

Make your own custom jewelry with Lost Wax Casting

What is lost wax casting?

Lost wax casting is a great technique for making original and interesting jewelry components. Lots of jewelers use it to produce their own designs. The best part is you can use your original model to subcontract some of the work for your jewelry by having a caster cast and polish your pieces for you.


The process is simple. In a nutshell, you create a wax model of your design. That wax model is set inside a steel flask and covered with plaster investment, leaving a funnel and tunnel to reach the wax through the hardened plaster. The flask is put into a kiln and the wax is "lost" as it's burned out of the flask. The flask is placed in a casting machine and the void left behind in the plaster is filled with molten metal. To see the process from spruing the wax through casting, watch this little video I've made. You may need the QuickTime plugin for Mac or PC to view the video.

5 Reasons to Cast your own Designs

1) Design your own original clasps, charms and jewelry to match your style and vision. If you are creative enough to make jewelry, you've probably already had dozens of ideas for parts you wish you could buy. Make them for yourself. Stand apart from other jewelers.


2) Add name recognition to your jewelry with a beautiful custom tag with your name or logo. Let them know when they have one of your original designs and make it clear and beautiful.


3) Design your own line of jewelry with a few unique pieces. It doesn't take a lot to get started, maybe as few as a half a dozen models. If you design them to mix well, you can create lots of variations and a distinctive line of your own original jewelry.

4) Stop using the same findings as other designers! Do you know how many jewelers are out there competing for the same customers? Half of most vendors at craft shows are jewelers. Stand apart right away from most of the pack with your own original designs, unique to you and your line.

5) Cast the same design in the metal of your choice: sterling, bronze, gold. You can stretch your investment, and lower costs by casting in a variety of metals, from the same wax model and the same mold.

Leverage your time and save money with Lost Wax
Every designer struggles with how to define their work, how to express themselves through their creations. The lost wax technique gives you a whole different level of freedom for bringing your ideas to life. In wax, you can sculpt and build up forms that would be almost impossible by regular soldering and fabrication techniques. The tools you need to make wax models are simple and home friendly. You can outsource the labor intensive casting, molding and reproduction to another company that can do the work for you in a fraction of the time. 
And if you're selling your jewelry, this technique can leverage your time. While you're working on shows, new designs, and all the rest you have to do to make it as a jeweler, your pieces are being cast and polished by professionals. All you have to do is tag it or assemble it into great jewelry. Plus, by subcontracting the casting, you can fix the price of labor and materials for your pieces, which helps you with your bottom line. 


What can you make with Lost Wax Casting?


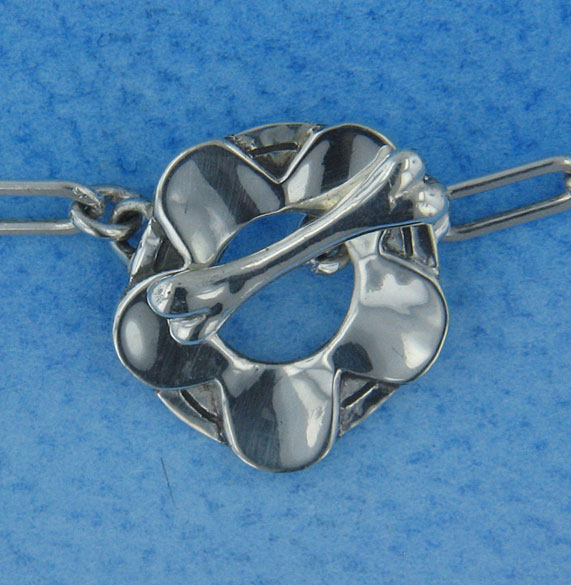
Make your own custom clasps, like a hook and eye, s-hook, or toggle set. Add your own style to make an original piece for your jewelry. You can even base your clasp on your logo or favorite image. Like this toggle clasp based on the logo for my jewelry line, BoneJour, of a flower and bone.
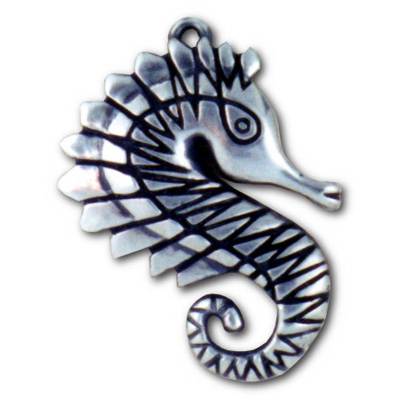
Make your own charms, pendants, rings, earrings, etc. Start a new line with a few pieces of your own, like this seahorse charm I made for a client years ago. This piece was in the same style as his artwork and was part of a whole line of different charms.

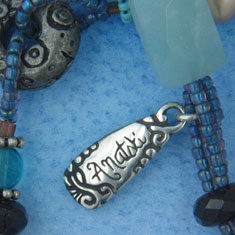
Make a custom tag with your name or logo. Sure you can stamp a flat tag, but everyone has one of those. What if your jewelry came with a beautiful tag that reflected your designs? Then your customers will recognize your work right away. And a good tag adds value to your designs.

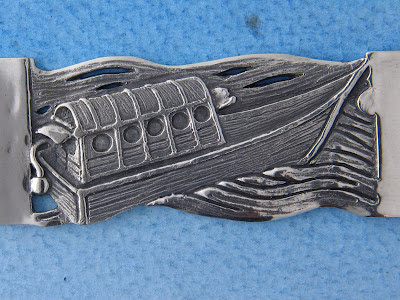
The only limit is your imagination. A lot of what you see in catalogs and stores has been cast. Casting your parts not only adds originality and value to your jewelry, it can save you time. If you fabricate some of your parts for your jewelry, you could save time by having them cast for you instead.

Learn Lost Wax Casting and Wax Carving
Learn all you need to know to get started with this great technique at the Silvera Jewelry School, in Berkeley, CA. 
The first class, Lost Wax Casting, teaches you about the casting process, about outsourcing your casting to casters, and most importantly, introduces you to the basic techniques for making your own wax models - carving, build up, polishing, etc. Students will even learn how to polish their finished casting during the workshop. 
Continue learning more about wax work with our follow up workshops, like Figurative Wax Carving, and Lost Wax Stone Setting. 
Figurative Wax Carving
Lost Wax Stone Setting

Post your questions about lost wax casting here, if you like. I'd be happy to help. 


Saturday, June 9, 2012

In a pickle. All about pickling solutions and how to dispose of them.


It's Q & A time, and one group of frequently asked questions sent to my email inbox is all about pickle. So, since for every 1 student who asks, at least 10 more were wondering about the same thing, I thought I would share some helpful and hopefully not too boring information about that funny cleaning solution we jewelers call pickle.

What is pickle?
Pickle is the solution used to clean metal, especially after soldering - to remove baked on flux and oxides that have formed on the metal. The oxides are typically concentrations of copper in the metal or alloy that come to the surface during annealing and soldering. The pickle strips these oxides, called fire scale from the surface.

For example, the copper in sterling (an alloy of 925 parts fine silver and 75 parts copper), concentrates on the surface of the metal in a not too handsome black or copper colored stain when it is heated with a torch in an oxygen rich environment, or what we lay people call "air". Even though soldering or annealing in a vacuum or room filled with inert gas may help to stop fire scale, I'm addicted to breathing oxygen and don't have any immediate plans to stop.

First point about pickle that is often confusing to students is that pickle removes fire scale, not fire stain. Fire scale is the oxide that sits on top of the surface, drawn up and through the metal by the heat and oxygen. Fire stain, is the dark grey or copper colored oxide that is still inside the metal, visible just under the surface. Fire stain can't be removed by normal pickling and must be sanded off with abrasives. So, when students first use pickle, they're stunned to still see copper stains on their sterling, even after soaking it for a long, long time. That's the fire stain. All the surface scale has been cleaned away, but the stain inside the surface is still visible and not going anywhere without persuasion, no matter how much the students beg or plead with the teacher.

Fire Stain on Sterling Silver
Even more confusing, sometimes sterling will come out of the pickle looking matte white like fine silver, but with a slightly clouded blotchy mottling. This is from a process called depletion gilding. Repeated heating and pickling of your sterling strips away copper oxides (fire scale) and depletes the sterling at the surface of some of the copper content in the alloy. Eventually, the sterling will be go from black or copper stained with firescale to matte silver white. This thin fine silver layer, or loam, is a frail mask over the fire stain, which is still there, underneath. In fact, it is that scale that is making the matte silver color look blotchy and cloudy. As soon as any abrasive polishing is done, the fire stain is revealed and back with a vengeance. Incidentally, depletion gilding metal is used to coat everything from castings to tableware, covering incidental fire stain, and if burnished with tumbling, etc. can be polished as a bright, fine silver "plating" over sterling.

Okay, you can't understand pickle without talking about fire scale, but back to pickle.

Here are some of the usual questions (besides what is pickle, which we covered above):

1) What's the best pickle to use?
Well, if you're working at home or in a home studio or if you're concerned about eco-friendly chemicals, then I would suggest vinegar based or citric based pickles. Sounds yummy.

Back in olden times, the first pickle cleaning solutions were made with alum, as in what you use to make, well, pickles. After that, pickle solutions became more aggressive. 10% sulphuric acid and acid substitutes like sodium bisulphate (aka Sparex #2 brand pickle solution for non-ferrous metals like copper, sterling, brass, etc), are your typical studio or shop choice. They're effective, but testy. Acid solutions and Sparex don't like steel tweezers or any steel being put into the pickle pot - it reverses the flow and puts copper back onto your metal. So if you wanted pink, coppery colored sterling, you got it. Taking the steel out of the pickle stops the reaction. Sparex splashed on clothing and surfaces can put pin holes in clothing and bubble floor finishes. It's durable and long lasting, but it also has to be neutralized with baking soda before disposing of it (see disposal of pickle later on in this post).

Instead, you can use home friendly pickle solutions like citric acid or vinegar and salt. Citric acid is a baking product and you can buy it in bulk or you can buy brand name citric acid pickle solutions like Black Magic Biodegradable Pickle. The brand name solutions seem to work better than just using straight citric acid and come with mixing instructions, usually something like a heaping tablespoon or more per cup of water. It definitely takes more citric acid than Sparex to make the same volume of pickle. But, on the plus side, this stuff is all natural, doesn't mind steel at all (no adverse or copper pink reactions to steel) and no neutralizing required. I've stored citric pickle in the pot for more than a month with no mold, etc and I've had students report that they've stored it for a couple of years in a jug and it was still effective. Interesting fact: if you mix some brands of citric acid based pickle you get a strong vinegar vapor that gets worse when heated. We're talking coughing and abused nostrils like a mild tear gas. Not fun. So, don't mix brands. Dump the old solution (see below), clean the pot with soap and water and add the new mix.

Looking for citric acid at the grocery store? Well, look for drink mixes high in ascorbic acid, aka citric acid, like Crystal Lite drink mix. It's refreshing, lemony, and it will strip scale from sterling. Delicious! However, drink mixes are also near opaque and very "warm lemony" smelling, and not very effective, so this is not my preferred natural pickle mix.

Another natural mix is vinegar and salt, one teaspoon of salt per cup of vinegar. Heat it as usual in your clean pickle pot and you have your own homemade pickle. And a lot more home friendly than Sparex or diluted acid.

No pickle and no ingredients? Well, in a pinch you can use almost boiling hot water to remove the flux and even a lemon, sprinkled with a pinch of salt, rubbed over your metal will clean it (especially if you boil off the flux first).

2) Do I have to heat pickle? Can't I use it cold? 
Yes you have to heat pickle. Yes you can use it cold. Wait a minute. What?

Well, yes, pickle is more effective if you heat it up. Don't boil it, just use a crock pot or pickle pot, set on low, to warm the solution up until it steams. When it's hot, your pickle will strip off the flux in a couple of minutes and get to work on firescale soon after. In five - ten minutes it's probably ready for more soldering. Leave it in longer to clean off the most firescale possible.

In fact, and this is where using cold pickle comes into play. You can leave your metal in the pickle for hours, even overnight. Cold pickle takes time to work, but in the shop, we'd leave metal in the pickle overnight to soak, with the pot turned off for safety, and come back to nice clean bits to work on.

Whatever you do, citric or sparex, natural or toxic, don't use a microwave to reheat your pickle once it's been used and has started to absorb copper. Especially if you share that microwave with food. I don't want a burrito that tastes like pennies, no matter how interesting that sounds.

Besides crock pots, other pickle pot solutions include used, no longer for baby, bottle warmers or mug warmers. And remember, once you use a crock pot for jewelry, it's not for chocolate fondue or slow cooking anymore - unless you're trying to make yourself a "last supper" you'll never forget.

3) When is my pickle done and used up?
When it doesn't work anymore. Well, duh. But you can tell it's done when it turns bright blue from all the copper it has absorbed. As it gets more and more blue, pay attention to how long it takes to pickle your metal. As you get more experience with pickling, your "pickle senses" will tingle with impatience when it's taking too long for something to clean. That's a sign that it's done. Just don't mistake that deadline you procrastinated on and the rapidly approaching arrival of your customer with bad or defunct pickle. Also, if the pickle gets contaminated and your metal is coming out gooey or coated with annoying substances, it's time for a new batch.

4) How do I dispose of pickle?
For Sparex or dilute acid pickles, you have to neutralize your pickle before you can dispose of it. Time for fun with science!

To neutralize an acidic solution (pickle) you add a base (like baking soda). Before you dump some baking soda in your pickle pot, check this out: adding a base to acid increases the volume of material rapidly, like a volcano experiment gone wrong from science camp. So, cool off the pickle and dump it in a larger container, like a bucket. Add baking soda until it stops fizzing and foaming. Now it's done.

For citric acid or natural pickles, no neutralizing is necessary. Just let it cool and you're ready for disposal.

But before you dump any pickle solution down the drain - stop! Natural or neutralized, green or blue used pickle is full of copper and local cities often have rules about dumping copper into the water supply. They don't like it. You have to dispose of it properly, like taking it in a labeled container to your hazardous waste dump and turning it in. They may laugh at you, but in your heart and behind those tears you'll know that you did the right thing. The geeky thing, but the right thing.

5) When is my metal ready to remove from the pickle?
Students often ask when is my metal done pickling? The answer is the same as the one to the question, "when are the clothes done in the dryer?" When they're done. :^) 

For pickling, you're done when the metal is a clean as it can be. How long that takes depends on the strength of the solution, its age, its temperature, and how much scale and flux were on on your metal when you put it into the pickle. 

What you'll learn about as you pickle is what the different metals will look like when they're clean. In general, the first thing that will be removed will be the flux. So you won't see or feel any glassy flux on the metal. 

Next you're looking for signs of the scale disappearing. At first scale is dark, then pink and then hidden under a clean coat of metal on top. That's because scale comes from copper in the alloy. Heating metals alloyed with copper will bring the copper up to the surface. 

Here's a list of signs that the metal is done picking for a few alloys:

Sterling: will look a mottled matte white when finished

Copper: will look like a matte pink copper color (sometimes darker copper scale seem to be stubborn, but  will scale will come off with a little scrubbing)

Brass: will turn a mix of matte copper (scale) and brass color. Copper scale on brass has to be polished off. 

There you have it. If you want more, more, more information about the wonderful world of soldering, grab a copy of my books and/or dvds, Soldering Made Simple: Easy Techniques for Kitchen Table Jewelers, Soldering Beyond the Basics, or sign up for a class with us at the Silvera Jewelry School in Berkeley, CA.

Have some tips about pickle - the jewelry kind, not the edible kind? Then please share it here. And thanks!

Your tools. Anywhere. Anytime with the best tool bag.

Like any semi-itinerant, freelance teacher, I travel to teach a lot - across the Bay Area and across the country. I've done it for years. Keeping my tools organized has always been a hassle. I tried plastic boxes, I hacked together wooden boxes from Ikea into a rolling tool drawer unit, I even traveled with a hanging tool apron. Nothing worked: tools fell out, it was awkward, or it just didn't provide a convenient, user friendly system for finding, using and immediately putting tools back in their respective, defined, location.

Until now. For a few months I've been using the Husky 16 in. Hang Up Tool Bag. I take it to the location where I'm teaching, I hang it on the edge of the table with all my tools available and in sight, and then I zip it up, take it back to the studio and hang it up near my bench - which solves the problem for teachers of having half your tools always packed up and in the wrong place when you need them. I love it.

The bag has 27 inside pockets, 20 straps for more tool storage and 4 outside pockets. It holds 8 pliers, multiple hammers, bench block, large and needle files, scribe, dividers, rulers, loupe, degree gauge, digital calipers, punches, saw frame, blades, bench pin, ring clamp, and more, more, more. On the outside I have pockets for torches, butane, a book and receipt books. It even comes with a strap so that you can wear it like a messenger bag. 

So how does it work? When you unzip the bag, the lid lifts up and there are three grommets for hangers (included with the bag). But I find these to be slippery and week, so I bring a small c-clamp with me and I use that to clamp through one grommet to the table. It never moves. Plus I have access to the larger inside pockets, which can hold my safety glasses, extra magniclips for the students, even small plastic parts boxes for polishing bits and cordless Dremels. When I'm done, I make sure the pockets are closed (Velcro) and close the bag and take it back home. 


I've even zipped this bad boy up and put it inside my checked luggage when flying to a teaching gig. In my experience, TSA has opened my suitcase and opened this bag, but everything is visible so there has been 0 loss and minimal disturbance by our dedicated security experts. The inside pockets are even clear so you can see what's inside without opening them. Very TSA friendly. It's heavy, but as long as the 50 pound weight limit is still valid, I can pack it and some clothes in one case for the trip. Now, hopefully I haven't tempted the vengeful demigods of travel and security into screwing with my luggage on our next trip. Oh please no! 


Need more mobile storage? 

Anat has been rocking this very cool Husky 18 in. Rolling Tool Tote and is giving me serious tool bag envy. I have to have one of my own and trick it out with perfectly sized boxes with... labels! We first saw this bag in use in Alaska while teaching at the Alaska Bead Company. Our student, Barbara Ramsey, brought this to class with all of her tools and supplies. Plus it rolls and zips up nice and tight and secure. Anat keeps her enamels for class inside along with assorted tools, and the generously sized outside pockets hold torches, butane, etc. 

And there's nothing better to do when you're neck deep in a rapidly growing to-do list than to procrastinate with some well deserved organization time. 

You can see these tool bags in action during upcoming classes with Anat or myself at Silvera Jewelry School or Baubles and Beads

Do you have a favorite tool organizing idea or solution. Please share it here! I'd love to hear about it.

### Update ###
The tool briefcase shown has gotten a little harder to find, so I wanted to post a few options as of October 2016.

Sears is selling the tool briefcase for about $30. There is also a similar bag made for Project Pink for sale at Sears.com, too.

Husky makes a new version of this bag, the Technician Bag, that is a little smaller, still hangs open and has lots of accessible tool storage for finding tools fast at class or for your home studio. 


Monday, May 28, 2012

Etching tutorial by guest artist Mona Clee

We are excited to have guest artist, teacher and author, Mona Clee, with us in June at Silvera Jewelry School. With her permission, I'm sharing a modified version of her article from ArtJewelry Magazine on etching as a little preview, a taste of all the tips, techniques and variety of approaches she will cover during the workshop.

Want more? check out her upcoming workshop, Saturday and Sunday, June 16 & 17 at Silvera Jewelry School in Berkeley, CA, Etching Workshop: Etching Sterling, Copper, Brass & More. Learn how to etch other metals, more techniques and get one-to-one help and patient support. You can register online anytime. 

Easy Etching by Mona Clee

Metal Etching is an exciting process you can use to transfer virtually any image or pattern to copper, nickel or brass. 

To transfer an image to metal, you'll need to use a material that will "resist" the dissolving action of acid. Where you apply the resist, the metal will be protected; everywhere else, the acid (ferric chloride) will etch the metal, leaving the protected metal in a raised image. 

One of the more versatile resists is a blue acetate film known as Press-n-Peel (PnP) paper. An image or pattern photocopied onto the matte side of this paper will transfer as a mirror image. If the direction of the pattern is important or includes lettering, consider what you'll use the etching for, and adjust the orientation of the image or letters so that they will read correctly on the finished product. You may need to photocopy the pattern onto a transparency and then flip the transparency appropriately before photocopying the image onto the PnP paper. 

[1] Transfer your artwork to PnP paper. Use a photocopier with a carbon-based toner to transfer copyright-free artwork or original designs from plain paper onto the matte side of the PnP paper. (PnP paper comes in 8.5 x11-in. sheets). The copier should be set to give the darkest image possible without smudging clear areas. The photocopied image on the PnP paper will act as a resist on the metal. The inks used in ink-jet printers generally do not work for transferring images with PnP paper. 

Pretest your iron.

The optimal heat for transferring images with PnP paper is just below the temperature at which the backing film on the PnP paper begins to buckle. Since irons vary in temperature, it is critical to pretest your iron. 

Begin testing by seating your iron one or two settings below maximum. Place a piece of scrap metal on a heat-resistant surface, and place the PnP paper on the metal, matte side down. Iron the paper. When the paper buckles, turn the temperature down slightly. That temperature is the optimal temperature. 

[2] 

Cut and prepare the metal. Use a metal shear or a jewelers saw to cut a piece of metal that is slightly larger than your image or pattern. The metal must be flat. If the metal is not flat, use a rawhide mallet to flatten it on a bench anvil. 

Use a scouring pad or sandpaper to clean the surface of the metal. Rinse the metal with water and dry it, taking care to handle the metal by the edges to keep skin oils off the surface. Wipe the metal surface with rubbing alcohol immediately before attaching the PnP paper. 

[3] 

 Apply the PnP paper as a resist to the metal. Cut your image or pattern from the PnP paper, leaving a metal border at least 1/4" in. (6.5mm) wide around the image. Place the metal on a heat-resistant surface and place the PnP paper, matte (image) side down on the metal. Use a circular motion with the iron to apply heat evenly across the surface of the PnP paper. The metal plate will become very hot, and the image will become more pronounced through the PnP paper's film backing as the transfer takes place. 

[4] 

Peel the PnP paper from the metal.  When the metal has cooled, lift one corner of the PnP paper, observing the transfer closely to make sure the image has completely transferred. If it has not, apply the iron again until you are satisfied with the transfer. If there are still any areas of the design that did not transfer, fill in and touch up the image with black permanent marker or nail polish. 

[5] 

Prepare for etching. Cover the back of the metal sheet with contact paper, coating the edges with nail polish or another resist to protect them from etching. 

[6] 

Use Styrofoam to keep the metal afloat during etching. Cut a piece of scrap Styrofoam about the size of your metal and at least 1 in. (25.5mm) thick. use double-sided tape or duct tape attached sticky-side out to adhere the back of the meal to the Styrofoam. 

Put on eye protection, an apron, and nitrile gloves before handling any acids. Make sure there is adequate ventilation in the area where you will be etching. See "Safety Notes," below for more information on handling ferric chloride. 


[7] Etch the metal. Pour just enough ferric chloride into a glass dish or plastic container to allow the meal to float easily. Put the metal plate face down in the acid. Gently rock the container to remove air bubbles fro the surface of the metal. Cover the container and leave the metal for approximately 1.5 hours. A shallow etch for a metal clay texture plate can be achieved in 30 to 45 minutes. See "Etching Tips" below for resist-endurance times. 

Clean the metal and remove the PnP resist.  Wear nitrile gloves or use plastic tongs to remove the metal from the ferric 

chloride. Submerge the metal plate in a solution of 2 cups (473.2mL) water and 1/4 cup (59mL) baking soda to neutralize the ferric chloride. Rinse the piece in clear water and remove the tape. Remove the PnP resist with acetone and a scouring pad. Finish the piece with a brass brush and soapy water. This should remove all traces of the resist and any other stains. It will also polish and burnish the metal, giving it a smooth, attractive finish. 

[8] 

Try these applications for etched plates. The finished etching can be made into a jewelry item, or you can use an etched pattern as a texture plate for metal clay or polymer clay. If you have etched into brass or nickel, you can use the plate to roll-print the texture onto sterling silver. 

Safety Notes

Wear safety glasses and nitrile gloves to keep the ferric chloride from contacting your skin or eyes. Wear an apron to protect your clothes. Do not touch your eyes if you have been handling ferric chloride. Do not inhale any vapors that may be given off by the ferric chloride. If skin or eye exposure occurs, rinse with water for 15 minutes and seek immediate medical attention. Take empty bottles of ferric chloride to the nearest official hazardous waste disposal site. 

To reduce your contact with the acid, etch small test panels using a timer so you know how long to leave the metal in the acid to achieve the desired depth of etching. 

Ferric chloride will stain everything it touches. Cover your work area with several layers of newspaper to protect the surface. if you rinse the ferric chloride into a sink, scrub the sink afterward with abrasive powder to remove any stains and residue. 

Etching Tips

A variety of materials can be used as resists - even a black permanent marker can be used to draw original artwork directly on the metal. Press-on letters, rubber stamps using permanent ink, and stickers from craft-supply stores will all work as resists. More traditional resists include lacquer, shellac, nail polish, rubber cement, asphaltum, electrical tape, contact paper, and paint. The creative applications are almost limitless. 

Rubber cement will stand up to the ferric chloride solution for 5 hours, and PnP paper will stand up to it for more than 3 hours, but permanent marker will begin to break down after 1.5 hours. A batch of ferric chloride is usually good for 5 hours of etching; after that, the etching process dramatically slows.

Wednesday, April 25, 2012

Author Interview with Joe Silvera


This is a video interview I did with my publisher, Kalmbach books, about writing Soldering Made Simple: Easy Techniques for Kitchen Table Jewelers. 

The video is part of their Meet the Author series. In the interview, I talk about the inspiration and goals for my book, but more importantly, there are lots of previews of pages, illustrations and diagrams from my soldering book. 

The chatter in the background is from the author event at Bead & Button. Lots of authors and such talking and sharing stories. There is also some fun film of the Meet the Teachers event at Bead & Button, from demonstrations during the show, and from classes I taught at the same event.

All in all, it's a sweet short video and especially helpful if you'd like to get to know more about my book, Soldering Made Simple: Easy Techniques for Kitchen Table Jewelers

To find out more about our jewelry classes in soldering, stone setting, lost wax and more, visit SilveraJewelry.com. Our classroom at Silvera Jewelry School in Berkeley is fully equipped. Each student has a jewelry bench and tools to use during class. Most classes include all materials for no additional fee. And techniques taught are home studio friendly so that you can continue making jewelry at home. 

Hope you like the video!

Friday, April 13, 2012

Watch a Bezel Setting Demo on Video with Joe Silvera

You can watch a free video about how to make a bezel setting with Joe Silvera, as part of my guest appearance on Jewel School. It's in two parts.


This was shot after my guest appearance on Jewel School to promote my book and dvd, Soldering Made Simple. It gives you the highlights of how to make a bezel setting. I rattled on for about 2 hours at least on film, so this is edited down to the essentials.

My favorite thing; the split screen on soldering to see soldering from above and below to put the bezel onto the sheet metal. My favorite laughs: I don't know, maybe it was my video player, but my voice seemed way out of sync with some segments - which makes me look like a dubbed kung fu movie actor. I like to turn the sound down and just make up what I'm saying. Like: "Hmm, you killed my brother. Now I will solder you into a setting with my jewelry monkey style. Hyahhh!" Okay, I need to get out more, but how often can you make fun of yourself on video?

Hope you like it! Want to learn how to set stones? Try our Stone Setting Suite Retreat, coming up in May at Silvera Jewelry School.

Thursday, April 5, 2012

New Summer Jewelry Workshops at Silvera Jewelry School


I just posted new summer workshop dates at SilveraJewelry.com, including lots of new classes in wax carving, like Lost Wax: Figurative Wax Carving, shown above.

Check out this 2-day workshop and more at Silvera Jewelry School.

Organize: Samples of your Enamel Colors


This post is about a recent moment of organizational genius that my wife Anat had in her enameling studio.

This sample board holds sample firings of some of the colors she uses. Each sample was fired on a uniform size penny (pre-1980) with a large hole punched in it.

The samples are hung on hooks on a board painted a simple white. Each sample is labeled with it's color and number. The labels were typed up on a document and then printed, cut out and taped onto the board - less expensive than using a label maker.

Anat measured the pennies and divided that into the length of the board to figure out the spacing for each row. She marked the locations for the hooks and made holes before painting. Then she painted the board and screwed in the brass hooks - find a size with a gauge that matches the hole.

And it's a beautiful solution! So pretty how they hang and catch the light. It makes it so easy to see the colors to choose for a project, even to take them off the hooks to compare side by side. My suggestion, as an organizational freak, is to label the back of each sample with its matching number, with a label machine, to make putting them back simple to do.

How do you organize your enamels or colors for your medium?

Tuesday, February 28, 2012

Organize your sandpaper and metal

If you're like me, then organization in the studio is something that you need, desire and lust after, and that only happens when you can finally conjure some time to tackle it - in other words, set aside the million items screaming for attention on your to do list for an hour and procrastinate with something else.

Not that organizing isn't a worthy activity. Lack of organization - searching everywhere and repetitively for the same supplies lost in the labyrinth of cupboards and boxes, over and over again - just eats up time in a very noticeable way. But it tends to take a back burner to more urgent, money making activities, like making jewelry. Even though a lack of organization adds to the time it takes to make something, thus costing more minutes of labor tacked on to every task.

Not so this week! Ha ha! I finally tackled a project that has been devouring time for a couple of years. I emptied my sandpaper boxes and reorganized them into a filing system. So simple. So alphabetical. So easy to find my sandpaper - and back stock that I forgot I had (i.e., couldn't find in the studio mess).

My solution? I found these simple manila folders that are closed on three sides, called file jackets. They fit into a handy open top file box and I can label each folder with the grit. Plus keeping them separated prevents cross contamination - in other words, I'm not getting 220 grit bits on my 320 grit papers from unauthorized canoodling in the bin. The jackets have an advantage over the open folders in that I can put in left over small pieces too - they're still good, handy for polishing and won't fall out of the folders.


It was so simple. Sandpaper is letter paper size, so it fits perfectly into these folders. There are even pocket folders available that expand to 1" wide or more for popular grits.


And it didn't take very long to do. In fact, I was so inspired, I jumped into the deep end of the procrastination pond and reorganized my metal cabinet using the same filing system. My metal has been hard to sort through, and made filling kits for classes a deja vu nightmare rerun. Gee, am I trying to say, that I was searching for the same metal every couple of weeks? Yup. Not any more!


Type of metal on the left. Form of metal on the right. So, I alphabetize it first by metal (argentium, brass, copper, etc.), then by form (sheet, solder, wire), and then by gauge or other pertinent sub-information. Of course, if you can read my writing in the photo, you can see it's still a bit of a jumble alphabetically in the bins, but that's the beauty of it! If I just keep up with part of it, like all the sterling is in the same place, then I can still quickly flip through the folders and find what I'm looking for. And again, the folders help to prevent scratches, loss, etc.

Even better - because my metal now has an obvious home to go back to, it stays organized. My rule for organizing: if it has a home to go to, it's easier to get organized. If not, it sort of drifts around the bench, counters and cupboards with no clear destination.

My previous systems for this? Up-cycled film canisters for wire, sheet, sterling, etc. but everything inside was a stack of bits and pieces and had to be resorted/found by gauge over and over. Once it's filed in this bin system, then I know metal, form and gauge. My other system? Binders with sheet protectors or plastic pockets. Which had the advantage of being able to be seen through the plastic sheets and flipped through, but the heavy metal just ate up even the heaviest weight sheets.

Want an even prettier system? Try these folders and boxes from the Container Store. Although, I'd still use the file jackets to keep my metal from falling out and into the bottom of the box.


For big pieces of metal (6x12), I use legal size file jackets and a matching file box. My 12x12" plates still have to sit in the cupboard. Just too big, but I suppose I could use a scrapbook folder or box to hold those too.... Off to the next project! Hope this helps to inspire your studio organization projects. Please share your solutions.


Friday, February 10, 2012

We moved to a new studio! It's bigger, full of light and we love it!


We've moved the Silvera Jewelry School into a new, bigger, spacious, gorgeous space for our jewelry school! We've expanded from 500 square feet to over 900. We're now on the corner of Virginia Street and San Pablo Avenue in Berkeley.

What does that mean for students and classes? Well, check this out: more room to walk around. We've increased the space around the benches to make it easier to get around your work space. There are more separate work areas for polishing, casting, photography, etc. There's a lounge area away from the benches where you can sit on a couch, sit and eat at tables, and help yourself to coffee, fruit, snacks, etc. We have a bigger area for supplies: metalsmithing tools, books, dvds, jewelry.

The space has high ceilings and sky lights, so that 900 square feet feels like 1500. And it was so nice to see the students at our first retreat in the new space (Art of Soldering, sold out!) sitting and mingling in the "lounge" before class. What a beautiful sight to behold.

We're so much closer to amenities like hotels (the Golden Bear Inn is right across the street), Enterprise Rental car is also across the street, cafes (Cafe Fanny, Acme Bread, Cafe Leila and more, all in walking distance. And we're a 10 minute walk from the North Berkeley BART station.

The school is unpacked and back in business, but we're still settling in to the new space. Here are some pics of the space as it's coming along, including photos of our students from the Art of Soldering workshop. More at Flickr.