Saturday, September 19, 2020

Metal Clay and Fused Glass


                                                            Metal Clay and Fused Glass             

                                                                 by: Arlene Mornick


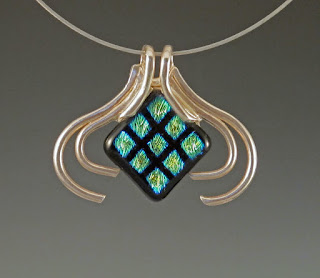
I love the uncomplicated beauty of glass. Looking through glass, I have the choice of seeing a likeness, if needed, or beyond to the porthole of my surroundings.  Add the reflective quality of art glass and the trance intensifies as the color palette of my world expands.  To enhance the look and uniqueness of my fused glass cabochons, I use the amazing medium of fine silver metal clay.  The low fire metal clay now available is very compatible with fused or lamp worked glass.   What better way to double the pleasure and enjoyment of jewelry then to marry the two mediums?  


My approach to combining the two elements (glass and metal clay) may be different from other artists.  When I create my jewelry pieces using glass, I use the metal clay to simply capture the class. Then in the firing when the clay shrinks its normal 8%, it acts as giant prongs holding the glass in place. 


Consider the following when constructing a glass and metal clay project. Remember during the construction of your piece the silver clay will shrink, therefore, when laying, sculpting, or molding your clay around the glass, do so gently but securely. Any silver touching the glass must not be tight fitting but instead gently lie on or touch the glass.  During the assembly, if the silver is securing the glass cabochon too tightly, when fired, the silver or glass may crack at the tightest point.  


What I am suggesting is that the silver must secure the glass, but that the construction and design must account for the shrinkage.  The best way to think about it is to remember to place the clay on or near the glass, do not pull the clay or fasten the clay tightly around the glass.


Join me for Metal Clay classes at Silvera Jewelry School  :: Browse classes


Tuesday, September 8, 2020

Tips for Making Hinges and Knuckles With Metal Clay


Arlene Mornick is an instructor at Silvera Jewelry School. She teaches online Zoom classes and in-person workshops in metal clay techniques, for beginners to advanced students.


A hinge is a movable joint or mechanism on which a top swings as it opens and closes over its base; or a component that connects linked objects. In wearable designs a commonly used jewelry hinge is called a “butt hinge.” 


The key components of this hinge are tubes called “knuckles” alternatingly fixed to the two adjoining sections of the design allowing one section to move while anchored to its base. Most often three knuckles are used, one attached and centered on the base of the piece.  The other two knuckles are attached to the adjoining edge, placed so that when fit together they line up on either side of the centered knuckle. Rotation of the knuckles around a center pin will enable the jewelry piece to open and close or swing as in my earring project. 


Options for Making Knuckles

One of the challenges to creating a butt hinge in metal clay is making the knuckles, which need to be uniform in size and shape.  There are a variety of ways to do this. Here are a few.


  • Recommended - Use a syringe. Trim the open tip off an empty syringe. Load the syringe with about 3 grams of clay.  Extrude the clay into a uniform snake. Trim the snake to the desired length of each knuckle.   Use a drill bit and hand drill a center hole through each knuckle. 


  • Roll a clay snake approximately 4 to 5 mm thick. Trim the snake to the desired length of each knuckle.  Use a drill bit and hand drill a center hole through each knuckle.

  • Create a clay tube: flatten clay to .75 mm thickness; wrap the flattened clay around a toothpick or 14-gauge wire; trim and seal a perfect seam with no clay overlap.  Trim the clay tube to desired knuckle length. 

  • Use the Makin’s Clay Extruder. Inside the barrel place clay, the extruder adapter and fit the rubber gasket inside the adapter and screw on the top. Using the handle, extrude a long hollow clay tube and remove from the extruder with sharp knife.  Straighten the tube. Then trim to desired knuckle length.


Options for Center Pin

Placement of the center pin wire can be done before firing or after.

  • Recommended - After firing:  To complete the hinge, line up the hinge knuckles and insert a piece of appropriate gauge half hard wire.  Trim the wire until there is approximately .5 mm extending from each side of the hinge, and hold the hinge perpendicular on a small anvil.  Gently tap the exposed end of the wire with a riveting hammer to expand that end.  Flip the piece and tap the other end of the wire. Continue in this manner until the rivet is secure.


  • Before firing:  Choose a gauge of wire that easily fits through the affixed knuckles.  If the wire fit through the knuckles is too tight the shrinkage of the clay knuckles during firing may trap the wire and impede rotation of the hinge. Trim the wire so that it is shorter than the length of the three lined up knuckles.  Feed the wire through all three knuckles.  Plug the two exposed ends with wet clay.  Dry. Fire project according to manufacturer’s recommended schedule.

Join me for Metal Clay classes at Silvera Jewelry School  :: Browse classes

Wednesday, August 26, 2020

The Alchemy of Metal Clay

By Arlene Mornick


Arlene Mornick is an instructor at Silvera Jewelry School. She teaches online Zoom classes and in-person workshops in metal clay techniques, for beginners to advanced students. 


To introduce artists to Metal Clay, I have offered demonstrations at schools and conferences in the Bay Area and beyond.  Metal Clay when taken out of the package looks like a “blob” of – well what else but “clay.”  Hence, the question I am frequently asked, “when does it become metal”? So just to be clear - it is metal from start to finish.  Here is a brief explanation of what Metal Clay is all about. 


Metal clay consists of micron-size particles of metal plus binder and water.  The binder and water grant malleability to the metal, so that it can be easily shaped in a variety of ways.  


Metal clay is moist and supple when taken from its package. Texture can easily be impressed on the surface and the clay can then formed in a variety of ways.  Once the clay is shaped, its water content should be allowed to dry out either naturally through air-drying (18 to 24 hours) or by use of a heating device (eg, hot plate, hair dryer, etc.) for 15 to 30 minutes.  In the water-dried state (more commonly called greenware), the binder is still actively holding the metal particles together. At this point sanding, filing, carving, and other techniques may be performed cautiously with the knowledge that the binder connection may be easily broken (but also easily repaired).


Once the design of an object is complete, high heat is applied to the piece either with a torch or in a kiln.  The first effect of the heating process is burnout of the binder.  This is observed when ignition of the binder causes an engulfment of the piece in flames. These flames will dissipate in a few seconds, and the continued application of heat will initiate the far less observable process of sintering, in which high heat promotes the attraction and bonding of the atoms.  The result is a solid mass of metal that has been compacted without melting. All manufacturers of metal clay will suggest firing schedules for the proper sintering of their products.  


If silver is the clay’s metal component, the surface of a piece will appear white when sintering and cooling is completed. This is due to uneven crystals on the surface that prevent the reflection of light. But the finishing process of burnishing and polishing will compress the crystals, making the silver color visible. 


Join me for a class and learn all about this wonderful material.