Wednesday, October 16, 2013

Tips for Working with Gold-Filled and other filled metals


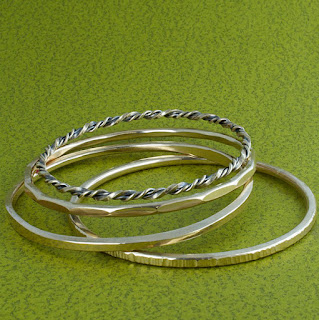
Filled metals, like gold-filled, are an inexpensive alternative to using gold in your jewelry designs. The outside layer of gold is much thicker than plating and can even survive soldering at high temperatures. But care has to be taken to avoid exposing the base metal core. These tips from my second book on soldering, Soldering Beyond the Basics, will help you successfully work with gold-filled metals. 

  • Keep filled metals protected during storage. Store wires and sheets separately in plastic bags to minimize scratches.
  • Rest it on soft leather to minimize work marks while filing, etc.
  • Joins must be aligned perfectly for soldering. There's too little gold to file or sand, by hand or with a flex shaft. Just a little filing can expose the base metal core, but you won't know until days later when it tarnishes.
  • Try to match the color of the joins by using 14k or 10k yellow gold solder. A yellow tinted sterling solder is also available, but it only comes in one temperature (medium).
  • Fill joins without overfilling. Use smaller pieces of solder to avoid big lumps.
  • Prevent firescale by using Pripp's flux.
  • Because of the bond between the two metals, the melting point is lower. Never use hard solder. Use medium, easy or extra-easy. A lower temperature flame, like butane, is less likely to burn your gold filled metal. If a small mixed gas torch is used, like a Smith Little Torch, use a medium flame and be gentle with the heat.
  • If your gold filled turns a coppery rose color after pickling, use pumice powder to gently clean the surface. Often this will return the gold color. 
  • Try to fix any scratches or problems with burnishing, which will polish without abrasion. A tumbler with mixed stainless steel shot is a safe way to polish.
  • If you still need to polish with abrasives, use the finest grits for polishing, like radials: blue 400 grit, peach 6µ and green 1µ.
Check out our workshops in fabricating with gold and sterling at SilveraJewelrySchool.com. And follow us on Facebook for more updates and tips. 


Thursday, August 15, 2013

Troubleshooting Tips for your Butane Torch

Sometimes, as your butane torch gets older and well used, it stops working. Usually, this means that the automatic ignitor has stopped working and the torch doesn't light. Before you throw that torch away, try these tips to fix it!

You can also catch some of these tips on our free video that I made with Beaducation: Butane Torch Safety. Troubleshooting starts at 15:56.

Safety: 

Please, before you work on or use your torch - wear safety glasses! It just makes sense. And never use a torch that is misbehaving so badly that it feels unsafe.

1 • Is the gas on?

Sure, it seems obvious, but sometimes the torch won't light because the gas lever is turned down. Turn the gas dial to maximum and try lighting again. Maybe it just wasn't getting enough butane to spark!


2 • Not enough oxygen? 

Another culprit is a lack of oxygen, which along with the butane can help the torch ignite. On some butane torches, there is a silver or black sleeve on the nozzle that rotates, opening and closing a vent that allows oxygen to mix with the fuel. If it's closed, the ignitor may not be able to spark the butane into a flame. Open it all the way and try again.


3 • No spark? 

The ignitor might be broken or clogged. How can you tell? Use a manual torch lighter, also called a sparker, to try lighting the torch. Start up the torch as usual, holding the trigger down to keep the butane flowing. Place the cup of the sparker a couple of inches in front of the nozzle and slide the flint back and forth to make a spark. If the butane lights, then the torch is fine, but the ignitor isn't working. Most torches require an external tool like a sparker to light them. Don't waste this torch just because the ignitor isn't working. Use the sparker instead. In fact, sometimes the problem is temporary, and I've seen the ignitors come back to life, days, weeks or even months later.


4 • Bad Butane? 

Not all butane is created equal. Cheap butane is oily and can clog your torch, preventing it from lighting. Check the opening of the nozzle for residue. If it's dirty, try cleaning it with a cotton swab or pipe cleaner, and maybe a little rubbing alcohol. Be sure to let the alcohol evaporate away completely before trying to light the torch! If that doesn't work, you may have to empty the torch and refill it. We've seen torches function better as their fuel is gradually replaced with better quality, premium butane. To speed things up, empty the torch by turning it on and locking it, so that the butane is venting out. This is best done outside in a safe place where the torch won't be disturbed for 20 - 30 minutes. If the torch ignites while you're trying to vent it, the flame can be blown out with a strong puff of air - from your mouth. Just keep your lips away from the heat! Once the torch is empty, refill it with the good stuff. Let it rest for 5 minutes, and then try it again.

5 • Missing something? 

This is a real life problem that has happened to me with large flame butane torches. The torch won't ignite - even with a sparker. When I checked the nozzle, the brass part inside was missing. This seems to work like a choke or something similar to make the butane focused enough to spark. Without it, your torch won't work. Often, when I look around, I'll find the little guy on the floor or on the bench. Replace it in the nozzle, pressing it in firmly with your tweezers. Usually works like a charm!


6 • Is the torch leaking? 

Have you ever noticed butane bubbling out of the nozzle or the fuel port on the bottom? This is a good sign that the torch is too full or that it's damaged. If the torch is too full, the pressure has to release somehow, so butane will bubble and spit out, usually from the fuel port. You can release the pressure by pressing on the little nipple inside the fuel port with a flat head screw driver or something similar. A jet of butane will come out. Check for butane spittle. Repeat until the dribbling stops. If it doesn't stop, your torch is probably damaged and shouldn't be used.


7 • Is your torch a spitter? 

Does the torch light but the flame goes crazy, losing it's focused blue shape and expanding into a yellow tipped blow torch? Well, first, turn it off. Something is obviously wrong. It may be temporary or the torch may be broken. A temporary problem would be an air bubble in the fuel line. This will either keep the torch from lighting or cause the flame to sputter and expand, usually ending by putting itself out. If it's an air bubble, one of two things will solve the problem: time or patience. Over time, the bubble will work its way out and the torch will work again. Maybe 20 minutes to a few hours. If you can't wait, try running the torch in a safe place where the big flame won't cause any problems. Re-ignite the flame as necessary until, after much patience, the flame settles back to normal.

If it never stops misbehaving, the problem may be a little more serious. Press the trigger down half way, enough to start the butane flowing, but not enough to ignite the sparker. Do you see a jet of liquid butane coming out of the nozzle? If so, release the trigger. Something is wrong and the torch is spitting liquid butane in a way that is messing up the flame. What to do? Try steps 4 and 6 to release pressure or change butane. If that doesn't work, the torch may be too damaged to use.


Saturday, July 27, 2013

Answers to some Common Questions about Soldering


  • Sheet, wire and paste solder? When would I use one over the other?
More than anything, I think this is based on preference, especially with sheet or wire solder. I'm not a big fan of paste solders and how they work, nor of the fumes and toxins from the flux binders when they smoke and go airborne. Paste solders may still melt into a ball, once the flux burns off, but they can end up away from the join and make a mess. Otherwise, I prefer sheet solders for gold, since you can stamp the information on the sheet for karat, color and flow point. For sterling silver solder, I prefer wire, since I can cut it into ultra small chips or flatten it if I need sheet solder for tension or similar solder joins. Sheet and wire solder allow you to control the size and placement of solder in a way that can't be matched by paste, in my opinion, which is especially essential for cleanly soldering mixed metals. 
  • Why do I need a kiln brick? Can I just use a red brick I have in my backyard or a rock?
That's a good question and I can understand the confusion. A normal household variety brick is fire proof, but it's also a huge heat sink. Instead of helping, it will take heat away from the metal and it's pretty dirty, which can foul up the whole thing. Fire brick is used to make kilns, it's takes heat and amplifies it, making it easier to solder, and it's soft, which helps with positioning pieces for soldering. They may both have brick in their name, but they're completely different. Bonus: fire bricks are very light in comparison to building bricks. 
  • When do I use Easy, Medium and Hard solder? What is the difference?
Solders come in different melting points, called flow points, from high to low, or in jargon terms from hard to medium to easy. Using different temperature solders helps you fabricate more interesting jewelry, with lots of joins, without it falling apart or putting gaps in previous solder seams. Imagine trying to solder together a box with a stone setting. You can solder the walls together with hard solder, add a top and bottom with medium solder, and then attach jump rings and the stone setting with easy solder. The first, higher temperature hard solder joins won't open or fall apart as you add the rest of the pieces of the box with medium solder. When the setting is attached with easy solder, the medium and hard solder joins don't flow, preventing distortion or open seams. As you practice soldering and your skills improve, you'll spend more time using hard solder, until you're fabricating with only hard solder. One reason to prefer hard solder and use it as much as possible is the color. Hard solder has the least amount of additive to lower its flow point, so it matches sterling silver the best, making your joins almost invisible. 

  • When do I use Penny Brite and when do I use Pickle? What are the advantages of each?
Most jewelry studios use pickle to clean metal after soldering. It's easier and requires less scrubbing. Since natural, biodegradable pickles are now available for safe use at home, they're even safer and easier to use than more acidic pickles like Sparex. If after pickling there is still some residual firescale, you can use a brass brush or scotchbrite pad with soap and water, or Pennybrite to further clean the metal. But for my work flow, Pennybrite is just too labor intensive as a stand alone method for cleaning after soldering. Also, sometimes PennyBrite just won't get into the nooks and crannies of a more complicated design. Further, in cases of hard, baked on flux, the Pennybrite may not be able to remove the glass-like flux. You would have to soak the pieces in very hot water first, so you're basically pickling anyway.
  • Do the Jump Ring ends have to meet if I am soldering them together or will the solder fill the gap?
Solder doesn't like to fill gaps, and a "filled join" is weak and will break. For precious metal solders to work properly, the join must be completely closed. 

If the join is closed something very cool happens: the join will draw the fluid solder into the seam and into the metal, making a join so strong you could stretch a ring up to 2 sizes without it breaking! Why does it do this? When you heat the metal, it expands, creating a microscopic vacuum. That vacuum draws the solder into the seam when it flows, like a capillary action. No join - no vacuum. 

So, for example, if you're soldering a jump ring, and the join is not closed, the solder will just flow onto one end or the other, but not fill or close the ring. If you close the jump ring so that the ends of the join are touching and flush, then the solder will be drawn easily into the join. How can you tell if the jump ring is closed? Hold the join up to a low light source like a fluorescent light, and look through the join. If you see a line of light at the join, it's open. If you don't see any light, it's closed and ready to solder.
  • Can I use any kind of torch for soldering?
When you know how to solder, you can use just about any flame to solder, from plumbing blow torches to cooking torches, super hot oxygen/propane little torches to blow pipes and candles - no joke, in some countries, filigree is soldered with a candle flame and blow pipe to direct the heat. 

When I first learned how to solder in college, our only torch was a natural gas flame. It had a flame that was almost big enough for casting and we had to solder anything from tiny jump rings to bracelets with that flame. When you learn the art and craft of soldering, you learn how to adjust your torch for low and high heat, what distance you should be from the flame, where the hottest part of the flame is, etc. 

Now, of course, some torches are more ideal than others for soldering, but it depends on the material and the size of the job. If you have a big piece to solder and a small flame, you probably won't be able to heat the metal enough for the solder to flow. You need the right size flame for the job. For jump rings and simple wire pieces, a normal micro butane torch is fast and efficient. For bigger pieces like heavy gauge rings, larger settings, even bracelets, a large flame butane torch will cover more surface area and be able to heat the metal enough for the solder to flow. For gold, the same rules apply, so you can use butane torches with gold, but to really take advantage of the properties of gold, a oxy/propane little torch will let you solder faster and accurately. And let's face it, if you're soldering gold, you probably want the nicest toys to work with, right? 

For a free video on how to set up to solder safely at home, visit SilveraJewelry.com.
  • How do I put the butane in the torch? 
Most butane torches will come with instructions for refueling and you should read those carefully - not just for refueling but also for how to light and safely use the torch. That said, a lot of butane torches refuel in the same way. First, your butane should be premium quality, the best you can afford. Cheap butane is greasy and can clog your torch. Make sure the nozzle on the butane canister fits the nozzle on your torch (on the bottom of the torch is a small recessed nipple that fits the nozzle for refueling). 


Interested in learning how to solder and getting some help? We have lots of classes in jewelry making, including casting, stone setting and working with gold at Silvera Jewelry School, in Berkeley, CA. Browse our calendar of classes today.


Tuesday, February 26, 2013

How to Make an Easy and Safe Torch Station

Using a torch in a studio is easy. Especially butane torches. Check out these free videos I made with Beaducation on how to use a butane torch and how to set up to work with a torch at home.

But what if you want to use a bigger torch, like an acetylene torch? Larger torches are great for annealing, soldering bigger pieces like bracelets, and for melting your scrap into ingots. With the larger, hotter flame comes more need for safety. But with around $50 worth of simple parts from a hardware store and about 30 minutes or less of effort, you can make a fire resistant torch station.


Supplies

This torch station I made for our studio at Silvera Jewelry School is made up of simple red house bricks, and 3 sheets of thin gauge sheet steel (18 gauge). How many bricks? That depends on how big of an area you want to enclose. The average brick is 8x4x2.25 inches. For my set up, I used about 12 bricks for the base, and another 16-18 bricks for the partial wall around the firing area. The sheets of steel were about 12x18".


Make a Torch Station

I made my torch station on a counter top for working with the torch while standing. I placed 2 sheets of steel on the table top, to protect the surface from the bricks. I laid out 12 bricks on top for floor of the torch station.


Next I put another sheet of steel on top of the brick base. This not only is extra protection while using the torch, but helps to keep small bits of metal from falling between bricks!


Then I started building a partial wall around the sides. The wall is higher in back and slopes down towards the front on the sides. This helps to protect everything around you from the flame as your working inside the wall of bricks. The weight of the bricks keeps them in place, but if you're working in a place that is mad for earthquakes, you could think about gluing the whole set up together with mortar. I put a large solder board or kiln shelf on top of the sheet metal. Working directly on the steel can warp it and compromise the work area. It's better to work on a solder safe board or annealing pan with pumice.


What about ventilation?

Working with a torch can create some fumes, especially from fluxes when heated. Fluxes can release chemicals, like fluorides, which can be harmful after frequent exposures. Having plenty of ventilation and circulation of air around your torch station is recommended. Installing a simple hood or even some ducting connected to a fan in a window can draw those fumes away from you. If in doubt about your ventilation, use a lightweight respirator to protect your lungs. You only have two of them!

Also, before using a tank torch, like a propane or acetylene, be sure to read, follow and understand all the instructions for safe set up and use. Secure the tank to something heavy so they don't fall down. Always play safely with fire, like setting up a safe work area.

Sunday, July 8, 2012

Make your own custom jewelry with Lost Wax Casting

What is lost wax casting?

Lost wax casting is a great technique for making original and interesting jewelry components. Lots of jewelers use it to produce their own designs. The best part is you can use your original model to subcontract some of the work for your jewelry by having a caster cast and polish your pieces for you.


The process is simple. In a nutshell, you create a wax model of your design. That wax model is set inside a steel flask and covered with plaster investment, leaving a funnel and tunnel to reach the wax through the hardened plaster. The flask is put into a kiln and the wax is "lost" as it's burned out of the flask. The flask is placed in a casting machine and the void left behind in the plaster is filled with molten metal. To see the process from spruing the wax through casting, watch this little video I've made. You may need the QuickTime plugin for Mac or PC to view the video.

5 Reasons to Cast your own Designs

1) Design your own original clasps, charms and jewelry to match your style and vision. If you are creative enough to make jewelry, you've probably already had dozens of ideas for parts you wish you could buy. Make them for yourself. Stand apart from other jewelers.


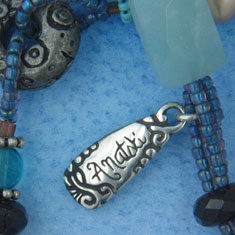
2) Add name recognition to your jewelry with a beautiful custom tag with your name or logo. Let them know when they have one of your original designs and make it clear and beautiful.


3) Design your own line of jewelry with a few unique pieces. It doesn't take a lot to get started, maybe as few as a half a dozen models. If you design them to mix well, you can create lots of variations and a distinctive line of your own original jewelry.

4) Stop using the same findings as other designers! Do you know how many jewelers are out there competing for the same customers? Half of most vendors at craft shows are jewelers. Stand apart right away from most of the pack with your own original designs, unique to you and your line.

5) Cast the same design in the metal of your choice: sterling, bronze, gold. You can stretch your investment, and lower costs by casting in a variety of metals, from the same wax model and the same mold.

Leverage your time and save money with Lost Wax
Every designer struggles with how to define their work, how to express themselves through their creations. The lost wax technique gives you a whole different level of freedom for bringing your ideas to life. In wax, you can sculpt and build up forms that would be almost impossible by regular soldering and fabrication techniques. The tools you need to make wax models are simple and home friendly. You can outsource the labor intensive casting, molding and reproduction to another company that can do the work for you in a fraction of the time. 
And if you're selling your jewelry, this technique can leverage your time. While you're working on shows, new designs, and all the rest you have to do to make it as a jeweler, your pieces are being cast and polished by professionals. All you have to do is tag it or assemble it into great jewelry. Plus, by subcontracting the casting, you can fix the price of labor and materials for your pieces, which helps you with your bottom line. 


What can you make with Lost Wax Casting?


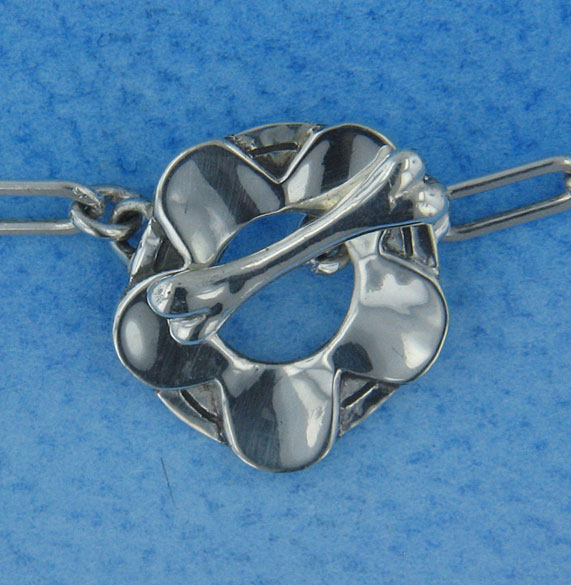
Make your own custom clasps, like a hook and eye, s-hook, or toggle set. Add your own style to make an original piece for your jewelry. You can even base your clasp on your logo or favorite image. Like this toggle clasp based on the logo for my jewelry line, BoneJour, of a flower and bone.
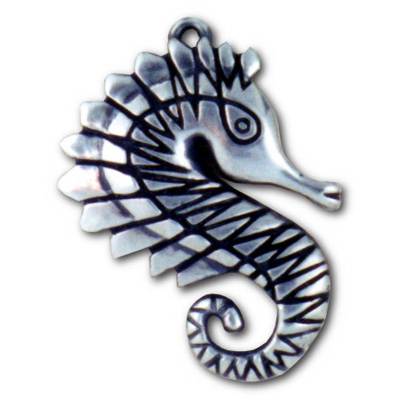
Make your own charms, pendants, rings, earrings, etc. Start a new line with a few pieces of your own, like this seahorse charm I made for a client years ago. This piece was in the same style as his artwork and was part of a whole line of different charms.

Make a custom tag with your name or logo. Sure you can stamp a flat tag, but everyone has one of those. What if your jewelry came with a beautiful tag that reflected your designs? Then your customers will recognize your work right away. And a good tag adds value to your designs.

The only limit is your imagination. A lot of what you see in catalogs and stores has been cast. Casting your parts not only adds originality and value to your jewelry, it can save you time. If you fabricate some of your parts for your jewelry, you could save time by having them cast for you instead.

Learn Lost Wax Casting and Wax Carving
Learn all you need to know to get started with this great technique at the Silvera Jewelry School, in Berkeley, CA. 
The first class, Lost Wax Casting, teaches you about the casting process, about outsourcing your casting to casters, and most importantly, introduces you to the basic techniques for making your own wax models - carving, build up, polishing, etc. Students will even learn how to polish their finished casting during the workshop. 
Continue learning more about wax work with our follow up workshops, like Figurative Wax Carving, and Lost Wax Stone Setting. 
Figurative Wax Carving
Lost Wax Stone Setting

Post your questions about lost wax casting here, if you like. I'd be happy to help. 


Saturday, June 9, 2012

In a pickle. All about pickling solutions and how to dispose of them.


It's Q & A time, and one group of frequently asked questions sent to my email inbox is all about pickle. So, since for every 1 student who asks, at least 10 more were wondering about the same thing, I thought I would share some helpful and hopefully not too boring information about that funny cleaning solution we jewelers call pickle.

What is pickle?
Pickle is the solution used to clean metal, especially after soldering - to remove baked on flux and oxides that have formed on the metal. The oxides are typically concentrations of copper in the metal or alloy that come to the surface during annealing and soldering. The pickle strips these oxides, called fire scale from the surface.

For example, the copper in sterling (an alloy of 925 parts fine silver and 75 parts copper), concentrates on the surface of the metal in a not too handsome black or copper colored stain when it is heated with a torch in an oxygen rich environment, or what we lay people call "air". Even though soldering or annealing in a vacuum or room filled with inert gas may help to stop fire scale, I'm addicted to breathing oxygen and don't have any immediate plans to stop.

First point about pickle that is often confusing to students is that pickle removes fire scale, not fire stain. Fire scale is the oxide that sits on top of the surface, drawn up and through the metal by the heat and oxygen. Fire stain, is the dark grey or copper colored oxide that is still inside the metal, visible just under the surface. Fire stain can't be removed by normal pickling and must be sanded off with abrasives. So, when students first use pickle, they're stunned to still see copper stains on their sterling, even after soaking it for a long, long time. That's the fire stain. All the surface scale has been cleaned away, but the stain inside the surface is still visible and not going anywhere without persuasion, no matter how much the students beg or plead with the teacher.

Fire Stain on Sterling Silver
Even more confusing, sometimes sterling will come out of the pickle looking matte white like fine silver, but with a slightly clouded blotchy mottling. This is from a process called depletion gilding. Repeated heating and pickling of your sterling strips away copper oxides (fire scale) and depletes the sterling at the surface of some of the copper content in the alloy. Eventually, the sterling will be go from black or copper stained with firescale to matte silver white. This thin fine silver layer, or loam, is a frail mask over the fire stain, which is still there, underneath. In fact, it is that scale that is making the matte silver color look blotchy and cloudy. As soon as any abrasive polishing is done, the fire stain is revealed and back with a vengeance. Incidentally, depletion gilding metal is used to coat everything from castings to tableware, covering incidental fire stain, and if burnished with tumbling, etc. can be polished as a bright, fine silver "plating" over sterling.

Okay, you can't understand pickle without talking about fire scale, but back to pickle.

Here are some of the usual questions (besides what is pickle, which we covered above):

1) What's the best pickle to use?
Well, if you're working at home or in a home studio or if you're concerned about eco-friendly chemicals, then I would suggest vinegar based or citric based pickles. Sounds yummy.

Back in olden times, the first pickle cleaning solutions were made with alum, as in what you use to make, well, pickles. After that, pickle solutions became more aggressive. 10% sulphuric acid and acid substitutes like sodium bisulphate (aka Sparex #2 brand pickle solution for non-ferrous metals like copper, sterling, brass, etc), are your typical studio or shop choice. They're effective, but testy. Acid solutions and Sparex don't like steel tweezers or any steel being put into the pickle pot - it reverses the flow and puts copper back onto your metal. So if you wanted pink, coppery colored sterling, you got it. Taking the steel out of the pickle stops the reaction. Sparex splashed on clothing and surfaces can put pin holes in clothing and bubble floor finishes. It's durable and long lasting, but it also has to be neutralized with baking soda before disposing of it (see disposal of pickle later on in this post).

Instead, you can use home friendly pickle solutions like citric acid or vinegar and salt. Citric acid is a baking product and you can buy it in bulk or you can buy brand name citric acid pickle solutions like Black Magic Biodegradable Pickle. The brand name solutions seem to work better than just using straight citric acid and come with mixing instructions, usually something like a heaping tablespoon or more per cup of water. It definitely takes more citric acid than Sparex to make the same volume of pickle. But, on the plus side, this stuff is all natural, doesn't mind steel at all (no adverse or copper pink reactions to steel) and no neutralizing required. I've stored citric pickle in the pot for more than a month with no mold, etc and I've had students report that they've stored it for a couple of years in a jug and it was still effective. Interesting fact: if you mix some brands of citric acid based pickle you get a strong vinegar vapor that gets worse when heated. We're talking coughing and abused nostrils like a mild tear gas. Not fun. So, don't mix brands. Dump the old solution (see below), clean the pot with soap and water and add the new mix.

Looking for citric acid at the grocery store? Well, look for drink mixes high in ascorbic acid, aka citric acid, like Crystal Lite drink mix. It's refreshing, lemony, and it will strip scale from sterling. Delicious! However, drink mixes are also near opaque and very "warm lemony" smelling, and not very effective, so this is not my preferred natural pickle mix.

Another natural mix is vinegar and salt, one teaspoon of salt per cup of vinegar. Heat it as usual in your clean pickle pot and you have your own homemade pickle. And a lot more home friendly than Sparex or diluted acid.

No pickle and no ingredients? Well, in a pinch you can use almost boiling hot water to remove the flux and even a lemon, sprinkled with a pinch of salt, rubbed over your metal will clean it (especially if you boil off the flux first).

2) Do I have to heat pickle? Can't I use it cold? 
Yes you have to heat pickle. Yes you can use it cold. Wait a minute. What?

Well, yes, pickle is more effective if you heat it up. Don't boil it, just use a crock pot or pickle pot, set on low, to warm the solution up until it steams. When it's hot, your pickle will strip off the flux in a couple of minutes and get to work on firescale soon after. In five - ten minutes it's probably ready for more soldering. Leave it in longer to clean off the most firescale possible.

In fact, and this is where using cold pickle comes into play. You can leave your metal in the pickle for hours, even overnight. Cold pickle takes time to work, but in the shop, we'd leave metal in the pickle overnight to soak, with the pot turned off for safety, and come back to nice clean bits to work on.

Whatever you do, citric or sparex, natural or toxic, don't use a microwave to reheat your pickle once it's been used and has started to absorb copper. Especially if you share that microwave with food. I don't want a burrito that tastes like pennies, no matter how interesting that sounds.

Besides crock pots, other pickle pot solutions include used, no longer for baby, bottle warmers or mug warmers. And remember, once you use a crock pot for jewelry, it's not for chocolate fondue or slow cooking anymore - unless you're trying to make yourself a "last supper" you'll never forget.

3) When is my pickle done and used up?
When it doesn't work anymore. Well, duh. But you can tell it's done when it turns bright blue from all the copper it has absorbed. As it gets more and more blue, pay attention to how long it takes to pickle your metal. As you get more experience with pickling, your "pickle senses" will tingle with impatience when it's taking too long for something to clean. That's a sign that it's done. Just don't mistake that deadline you procrastinated on and the rapidly approaching arrival of your customer with bad or defunct pickle. Also, if the pickle gets contaminated and your metal is coming out gooey or coated with annoying substances, it's time for a new batch.

4) How do I dispose of pickle?
For Sparex or dilute acid pickles, you have to neutralize your pickle before you can dispose of it. Time for fun with science!

To neutralize an acidic solution (pickle) you add a base (like baking soda). Before you dump some baking soda in your pickle pot, check this out: adding a base to acid increases the volume of material rapidly, like a volcano experiment gone wrong from science camp. So, cool off the pickle and dump it in a larger container, like a bucket. Add baking soda until it stops fizzing and foaming. Now it's done.

For citric acid or natural pickles, no neutralizing is necessary. Just let it cool and you're ready for disposal.

But before you dump any pickle solution down the drain - stop! Natural or neutralized, green or blue used pickle is full of copper and local cities often have rules about dumping copper into the water supply. They don't like it. You have to dispose of it properly, like taking it in a labeled container to your hazardous waste dump and turning it in. They may laugh at you, but in your heart and behind those tears you'll know that you did the right thing. The geeky thing, but the right thing.

5) When is my metal ready to remove from the pickle?
Students often ask when is my metal done pickling? The answer is the same as the one to the question, "when are the clothes done in the dryer?" When they're done. :^) 

For pickling, you're done when the metal is a clean as it can be. How long that takes depends on the strength of the solution, its age, its temperature, and how much scale and flux were on on your metal when you put it into the pickle. 

What you'll learn about as you pickle is what the different metals will look like when they're clean. In general, the first thing that will be removed will be the flux. So you won't see or feel any glassy flux on the metal. 

Next you're looking for signs of the scale disappearing. At first scale is dark, then pink and then hidden under a clean coat of metal on top. That's because scale comes from copper in the alloy. Heating metals alloyed with copper will bring the copper up to the surface. 

Here's a list of signs that the metal is done picking for a few alloys:

Sterling: will look a mottled matte white when finished

Copper: will look like a matte pink copper color (sometimes darker copper scale seem to be stubborn, but  will scale will come off with a little scrubbing)

Brass: will turn a mix of matte copper (scale) and brass color. Copper scale on brass has to be polished off. 

There you have it. If you want more, more, more information about the wonderful world of soldering, grab a copy of my books and/or dvds, Soldering Made Simple: Easy Techniques for Kitchen Table Jewelers, Soldering Beyond the Basics, or sign up for a class with us at the Silvera Jewelry School in Berkeley, CA.

Have some tips about pickle - the jewelry kind, not the edible kind? Then please share it here. And thanks!


Your tools. Anywhere. Anytime with the best tool bag.

Like any semi-itinerant, freelance teacher, I travel to teach a lot - across the Bay Area and across the country. I've done it for years. Keeping my tools organized has always been a hassle. I tried plastic boxes, I hacked together wooden boxes from Ikea into a rolling tool drawer unit, I even traveled with a hanging tool apron. Nothing worked: tools fell out, it was awkward, or it just didn't provide a convenient, user friendly system for finding, using and immediately putting tools back in their respective, defined, location.

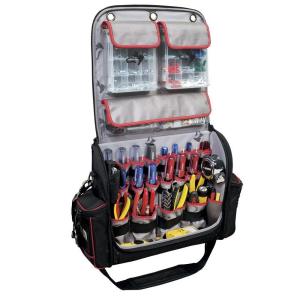
Until now. For a few months I've been using the Husky 16 in. Hang Up Tool Bag. I take it to the location where I'm teaching, I hang it on the edge of the table with all my tools available and in sight, and then I zip it up, take it back to the studio and hang it up near my bench - which solves the problem for teachers of having half your tools always packed up and in the wrong place when you need them. I love it.

The bag has 27 inside pockets, 20 straps for more tool storage and 4 outside pockets. It holds 8 pliers, multiple hammers, bench block, large and needle files, scribe, dividers, rulers, loupe, degree gauge, digital calipers, punches, saw frame, blades, bench pin, ring clamp, and more, more, more. On the outside I have pockets for torches, butane, a book and receipt books. It even comes with a strap so that you can wear it like a messenger bag. 

So how does it work? When you unzip the bag, the lid lifts up and there are three grommets for hangers (included with the bag). But I find these to be slippery and week, so I bring a small c-clamp with me and I use that to clamp through one grommet to the table. It never moves. Plus I have access to the larger inside pockets, which can hold my safety glasses, extra magniclips for the students, even small plastic parts boxes for polishing bits and cordless Dremels. When I'm done, I make sure the pockets are closed (Velcro) and close the bag and take it back home. 


I've even zipped this bad boy up and put it inside my checked luggage when flying to a teaching gig. In my experience, TSA has opened my suitcase and opened this bag, but everything is visible so there has been 0 loss and minimal disturbance by our dedicated security experts. The inside pockets are even clear so you can see what's inside without opening them. Very TSA friendly. It's heavy, but as long as the 50 pound weight limit is still valid, I can pack it and some clothes in one case for the trip. Now, hopefully I haven't tempted the vengeful demigods of travel and security into screwing with my luggage on our next trip. Oh please no! 


Need more mobile storage? 

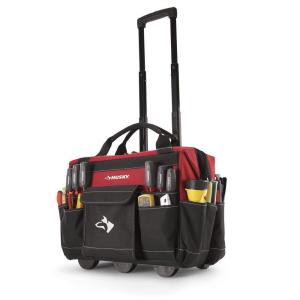
Anat has been rocking this very cool Husky 18 in. Rolling Tool Tote and is giving me serious tool bag envy. I have to have one of my own and trick it out with perfectly sized boxes with... labels! We first saw this bag in use in Alaska while teaching at the Alaska Bead Company. Our student, Barbara Ramsey, brought this to class with all of her tools and supplies. Plus it rolls and zips up nice and tight and secure. Anat keeps her enamels for class inside along with assorted tools, and the generously sized outside pockets hold torches, butane, etc. 

And there's nothing better to do when you're neck deep in a rapidly growing to-do list than to procrastinate with some well deserved organization time. 

You can see these tool bags in action during upcoming classes with Anat or myself at Silvera Jewelry School or Baubles and Beads

Do you have a favorite tool organizing idea or solution. Please share it here! I'd love to hear about it.

### Update ###
The tool briefcase shown has gotten a little harder to find, so I wanted to post a few options as of October 2016.

Sears is selling the tool briefcase for about $30. There is also a similar bag made for Project Pink for sale at Sears.com, too.

Husky makes a new version of this bag, the Technician Bag, that is a little smaller, still hangs open and has lots of accessible tool storage for finding tools fast at class or for your home studio.