

note: this is an excerpt from my book, Soldering Beyond the Basics. There is more about setting up your studio in the book.
My students ask me all the time about setting up a studio. Most of us learn jewelry in a classroom, where the metalsmithing department is full of benches, tools, polishing and casting equipment.Translating that big space into your own studio is overwhelming, but the truth is that a jewelry studio can be as small as one table or a bench.
Now, the words “home” and “studio” may not seem like a reasonable combination, especially when considering using jewelry tools, torches, flex shafts and such. It naturally brings up common questions, like is it safe? where should I put my studio? can I solder at home? The answers are yes, almost anywhere, and absolutely. I’ve worked in goldsmith shops and lots of studios. They were parts of retail shops, home studios or office spaces. The floors ranged from wood to carpeting - not your first choices in fire safety. Bench tops were made of wood, walls were normal dry wall. And yet, we never had a fire. Why? Because we practiced commonsense safety rules.

Later, when I became an independent jeweler, I took what I learned about work place safety to my home, where my studios ranged from spare bedrooms, half of a room, a shed in the yard, even a little 6x6’ space outside of my bathroom! That tiny space contained my bench, a casting machine, polishing motor, kiln and everything else I used to solder, fabricate and cast jewelry. Your studio can start with just a bench or sturdy table, with just a little organization. And once it’s set up, you can make jewelry anytime you want. As long as you don’ wake up the neighbors!
Basic Safety Rule #1: The flame stays where it belongs.
The first safety rule to learn is to keep the flame where it belongs - in the soldering area! This includes igniting the torch, which for some reason, most beginners think should take place while pointing the torch in the air, at the table, into the bench or even at each other! The only surfaces that can safely take the intense heat of any torch are your solder board, charcoal, fire bricks, etc. Everything else burns: you, your table, the carpet, etc.
Setting up for Safety
Obviously soldering is the number one concern for safety. Sawing, filing, even polishing with the clean bits I recommend are benign when compared to flames and red hot metal. With a few simple precautions, you can solder safely at home.
Protect your Table
Heat will eventually pass through a solder board and burn an unprotected table. Work on a flame proof table or protect the table you have with something fire-proof. Not everyone has a steel table. Most benches and tables are made of wood.Put something under your board, like a 1x1’ ceramic floor tile. Keep the solder area clear of anything flammable, like paper or plastic.
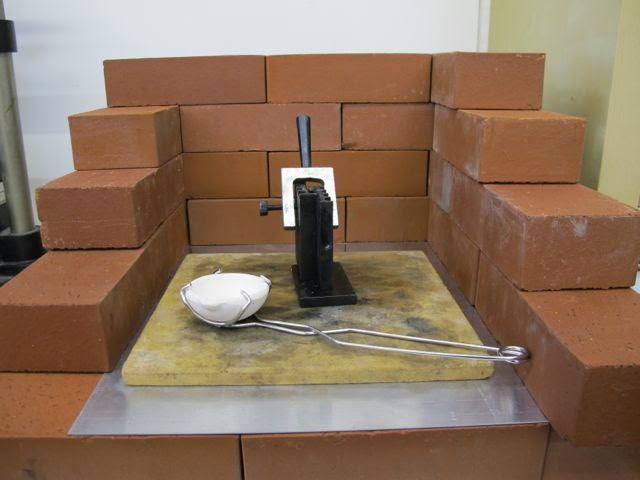
The next level of protection would be to cover the table top with concrete tile backer board, available at hard ware stores. Score it with a utility knife and then snap it to size. Want more protection? Set up a torch station with some landscaping bricks. [ B ] This is a good choice for tank torches, especially if they have large tips with big hot flames. A station like this can handle soldering, annealing, even casting ingots. Put a sheet of steel down as a base to catch small parts. The brick wall around the sides help to keep the flame where it belongs - inside the work area.
Protect your Room
Let’s face it - gravity works even in the studio, so eventually something hot will fall on the floor. If you care about your floor, protect it with a remnant carpet or mat. Just confirm that anything hot that falls on your safety mat is quenched and doesn’t smolder.If you set up to solder less than 3 feet from a wall, protect it with a sheet of concrete tile backer board.
Where to set up your studio
The best place to set up your studio is in an open space that has some natural ventilation, like near a window. The worst place to set up would be in a confined space, like a walk-in closet. Even though this book emphasizes safer tools and chemicals, there are still some fumes that could affect your health if you solder full time for years. Solders contain zinc, and when they flow a little is released as gas. Some flux contains fluorides, which also create fumes. Non-fluoride fluxes are a healthier alternative. Keep your face back from the solder area. Hovering your face over the board is a one way ticket up your nose for heat and fumes.
A simple way to increase ventilation is to work near a fan. The fan should blow away from your solder area, to draw the air. A low budget ventilation system can be made with ducting from the hardware store and a window fan. The ducting sends any fumes out the window. An kitchen exhaust hood works, too, but has to be installed. Lightweight respirators and dust masks rated for minor fumes from soldering are available from jewelry suppliers.
Set up your studio near a water source, to refill quench bowls, pickle pots and for cleaning. The best choice would be a utility sink, something not shared with food or dishes. In my studio that was in a small building in our yard, I filled a container with a spout, like a drink cooler, and used a big bowl to make a quick sink. The pickle pot can be on the bench with a tray to catch spills, or near your sink.
Good lighting can make a big difference in your studio. Natural light is best, but it’s easy to add a good lamp to your work area. Daylight matching bulbs are good for reading detail and color. One draw back to too much light is that it’s difficult to see the first stages of heat on metal, as it glows a light pink, especially on silver. Dim the light or use a shade. A soldering station with bricks can have another steel sheet across the top for a hood, providing shadow while you solder or anneal.
Jewelry Benches vs. Kitchen Tables
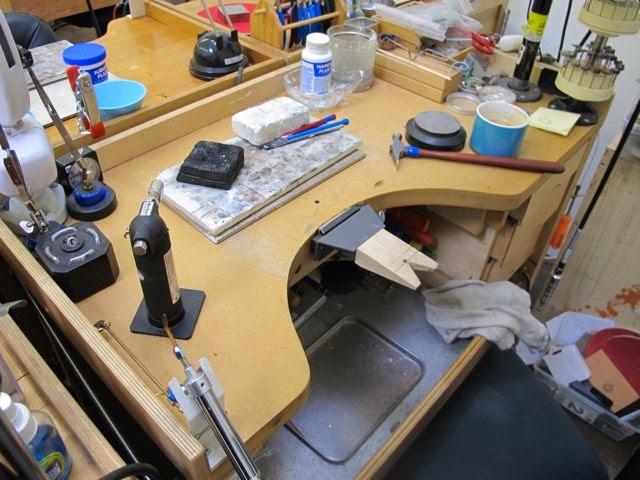
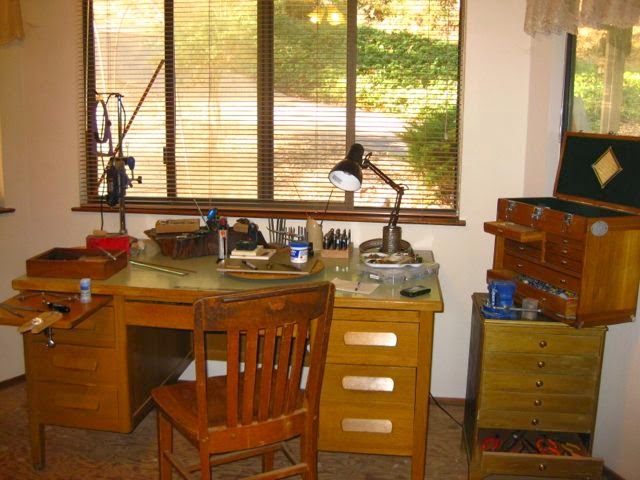
One or two sturdy tables can make a perfectly usable work area for jewelry. One of my benches was made with a table top on top of two drawer units. Use solid wood tops to withstand hammering. Lighter tables can be braced against a wall. Bench pins, for sawing and filing, can be clamped to the table or screwed in place. The drawers were used to store tools. Labels made it easy to put them away - if a tool has a home, it has a place to go.
Normal tables are low for jewelry work. Sawing, filing, even soldering is best when the table is raised to counter height, about the level of your clavicles. If the work is too low, then your neck and back will hunch, causing injury and pain over time. When seated, your eyes are close to the work, which promotes better posture. [ D ] Use an adjustable chair to raise and lower yourself for the job at hand. Down to be closer to the pin to see better while filing, sawing, or setting. Raised for soldering. The soldering area can be raised with a stack of fire bricks or charcoal blocks, and the pin can be put in a bench vise, adding another few inches of height, if the chair can’t be lowered enough.


Filing and sawing make a lot of dust, and sterling dust is worth money. If you file over a tray, you may be stunned by the amount of dust that piles up! Filings and small bits of metal can be recycled for credit or cash at a metal refinery. A table doesn’t have a tray, like a bench for catching metal, but with a little imagination, one can be added. One solution is to wear your tray! Wear an apron that is hooked to the underside of the table. The apron makes a bag underneath the pin, catching filings. Snapping the bottom of it gathers all the bits in the middle for collection. Just don’t forget to take it off before you get up!
A jewelers bench is ergonomic helps you organize your tools. It’s like customized tool box with a place to work! [ E ] Benches can cost under 200 dollars or over 2000, and are simple enough to make your own, if you or someone you know is handy. The height can be customized for you by sawing the legs, and most come equipped with a sweeps tray for filings, drawers for tools, and a bench pin. The top of the bench is a little high for some tasks, like hammering, but you can stand, put the anvil in your sweeps drawer, or use a lower table.
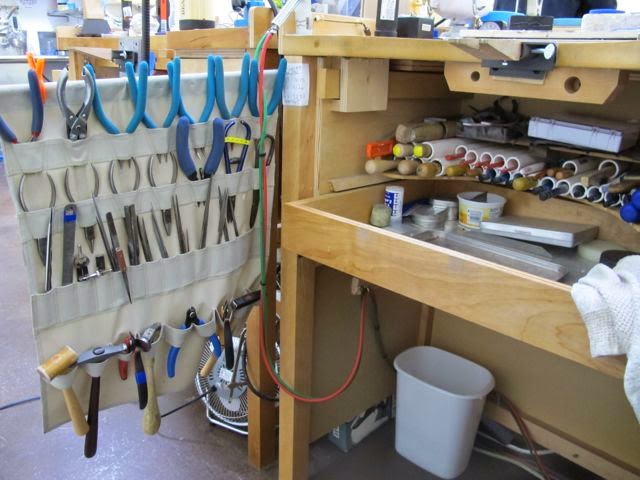
Make your bench work for you by making places to store your tools within easy reach. Bench aprons can be attached that telescope out with hanging storage for files, pliers, and hammers. [ F ] The shelf inside the bench can hold lengths of inexpensive plastic pipe, to organize your files. [ G ] And there are lots of bench accessories that save space, transforming themselves from a bench pin to a solder board, for example. [ H ] An organized bench packs most of what you need into a small space.

Check out pictures of real home studios submitted by our students on our Facebook page.
A great resource for lots of ideas about how to organize your bench and studio is Charles Lewton-Brain's book, The Jewelers Bench Book. One of my favorites! I highly recommend it.
25 comments:
he following is a list I have compiled by my own experience with using crystals over the years and what the stones have communicated with me. EMF Protection
good post..........
Jewellery chain making machines
Thank you for taking the time to do such a helpful and detailed article! I am moving my jewelry studio from my bedroom into our unfinished, currently scary dark basement, and I need all the ideas I can get! I can't wait to have my own space!! :-)
I’ve been searching for some decent stuff on the subject and haven't had any luck up until this point, You just got a new biggest fan!.. jewelry stores in scottsdale arizona
Really good article. Thanks for taking the time to explain things in such great detail in a way that is easy to understand.
Terrazzo Tile | cement tile supplier | Terrasso Tile Supplier
Really nice and interesting post. I was looking for this kind of information and enjoyed reading this one. Keep posting. Thanks for sharing. studio recording
Hi - Thanks for the article.
I have been trying to find some way to ventilate the fumes from soldering and chemicles like pickle. I don't see any info here about this and it appears in the photos of jeweler's benches that people are soldering without a specific ventilation system.
Do you have any suggestions for how to ventilate fumes without cutting holes in the wall or opening a window when it is very very cold outside?
So far I don't solder very often, but I do use the torch to anneal a lot and other applications like balling up silver wire etc.
Thanks for your help.
Thank you for this writeup. I never had heard of a bench apron before and after some quick searching online, I was able to find one that works perfect with my current bench.
Thanks for the article as I would have never even known they existed without reading about them.
Mark
Black Six Jewelry - Stylish High-End Handcrafted Copper and Silver Jewelry
Jewelry Care Guide Really good advice!!! Thank you for the valuable information on this tips.
The superb highly informative blog I’m about to share this with all my contacts. Homepage
Hello! This is my 1st comment here so I just wanted to give a quick shout out and tell you I really enjoy reading your posts. Can you recommend any other blogs/websites/forums that deal with the same topics? Many thanks! photography studio equipment
I'm not sure where the 1x1 ceramic floor tile is to be placed. Is it placed on the table or floor?
Marie - The tile is placed on the table, under your solder board, to help protect the table from the torch.
Great post. Buy gold pendant set designs online.
Hi Joe! Love your article and answers to questions. Super informative and amusing! Not boring at all even though I don't understand a lot of it! LOL! Anyway, I have a question. I have some jewelry from a "famous" brand. The silver (sterling) is oxidized to make it look "antique" or whatever. I don't like it now and would like it to be regular shiny-ish silver. A friend who makes jewelry said I could put it in pickle. I have the Sparex #2. The stones in the jewelry are either quartz crystal or Austrian type crystals (i.e., Swarovski). So, before I mix up the pickle I'd like to know if I'll be wasting my time and possibly ruining the jewelry. Thanking you in advance! Keep up the good work!! Your new fan, Ellen.
You should see how my friend Wesley Virgin's adventure launches with this SHOCKING AND CONTROVERSIAL VIDEO.
As a matter of fact, Wesley was in the military-and shortly after leaving-he discovered hidden, "self mind control" secrets that the government and others used to get everything they want.
THESE are the same SECRETS many celebrities (notably those who "come out of nothing") and top business people used to become wealthy and famous.
You've heard that you only use 10% of your brain.
That's mostly because the majority of your BRAINPOWER is UNCONSCIOUS.
Maybe that expression has even taken place INSIDE your very own head... as it did in my good friend Wesley Virgin's head about seven years ago, while riding a non-registered, beat-up trash bucket of a car with a suspended license and on his banking card.
"I'm so frustrated with living paycheck to paycheck! When will I become successful?"
You've been a part of those those types of thoughts, right?
Your success story is waiting to happen. All you have to do is in YOURSELF.
CLICK HERE To Find Out How To Become A MILLIONAIRE
Post a Comment